VIOStream Setup Guide
Introduction
The VIO Stream is a single Cablecast system whose main output is an HLS Web Stream. It can Schedule playback of videos, network streams, Live input, and Cablecast CG bulletins. The VIO Stream is ideal for customers that do not have a physical cable channel but want to have an online programming presence. For example, houses of worship or school athletic departments. In this guide we will go over the steps to setup configure your new VIO Stream.
Prerequisites
Before beginning the installation and configuration, please make sure that you have the following resources available:
An ethernet network connection
A keyboard, mouse, and a VGA monitor
A network stream and/or SDI source
Overview of Setup
There are three parts to setting up your Cablecast VIO Stream server: Physical Setup, Software Setup, and Testing. Physical Setup: You'll learn about the physical connections on the Cablecast server, and how to tie it into your existing infrastructure. Software Setup: You will be taken through the steps necessary to configure the Cablecast software to communicate and work with your server. Testing: Finally you'll run some simple tests to make sure the Cablecast server is correctly configured and ready to use. Sound like a plan? Let's get started!
Part 1: Physical Setup
Your Cablecast server should come with the following items in the box: AC power cable: Powers the Cablecast server Server: The Cablecast server itself Physical Connections On the back of your Cablecast server, you'll see several ports. Please refer to the diagram below for connections on your VIO Stream server. All of the Cablecast servers share some basic system connections:
Connect a keyboard and mouse via the USB ports.
Connect a monitor. The monitor is required for the server setup, and we recommend that it remain connected. All Cablecast servers have at least a VGA port, and this is what we recommend connecting up to the KVM (or local monitor) in your rack.
Connect the Cablecast server to the network via one of the ethernet network jacks.
Connect the Cablecast server's power supply to an AC power source using the provided AC power cable.
Next, you will connect the Cablecast VIO Stream to the Live Source if you are planning on using one. There is only one SDI port on the back of the VIO Stream and that is for Video input. FIGURE 1: The Cablecast VIO Stream

AC Power
RS232 COM port (male)
USB 2.0
USB 3.0
Ethernet
VGA
SDI Video In
Powering On Once your Cablecast server is connected, power on the server by pressing the power button on the front of the unit. The unit will boot and go through Windows System Preparation steps. You will need to create a Windows user/pass, and once into Windows be ready for both IO configuration (if needed) and Cablecast software setup. Be sure to note your username and password, as Cableast support does not have a way to recover the credentials other than to reimage a system. Also note that if you plan to do network playback across servers or configure a NAS to work with video servers/VOD, the Windows credentials across the servers need to be the same.
Part 2: Software Setup
With a new Cablecast system, a system commissioning appointment is included. This is where a member from the Cablecast Customer Support Team assist with the initial configuration and testing of your new server. We highly encourage all customers work with Cablecast Support when installing a new server. They can be reached by email at support@cablecast.tv Control Modules Setup The first things we will need to do in the setup of the Cablecast software is to configure the Control Modules. Navigate to Settings > Location Settings > I/O Tab > Control Module Sets There are 3 Control Modules that need to be setup.
VIO Playback: CablecastVideoServerPlaybackCM - In the Port/IP/Local Path field you will add the location where your video file will live. We recommend E:\
VIO Encode: CablecastVideoServerEncodeCM - In the Port/IP/Local Path field you will add the location where Encoder will write files. We recommend the same directory as your Playback (E:\)
Video On Demand: VODCM - In the Port/IP/Local Path field you will add the location of your VOD files. Use E:\VODContent
FIGURE 2: Control Module Sets

Live Streaming Setup Next we will setup the Live Streaming portion of your VIO Stream. Navigate to Settings > Location Settings > I/O Tab > Live Streaming Click on New to create a new stream. Then to setup and edit that stream click on the name of the stream just created.
Name your Stream
From the Channel dropdown menu, select the channel that this stream is for
In the Live Streaming CMS dropdown, select the VIO Playback Control Module that you created in the previous step
Select the Stream Resolution from the dropdown for the desired playout resolution. Generally this should match the highest resolution of the source material being used on the server
Choose a number of Qualities to support the adaptive bitrate HLS stream playback. We recommend no more than 3, this will limit the amount of streams and bandwidth your Cablecast System will need to create the different versions.
In current Cablecast software you are able to set Player configuration. Click on the Autoplay Enabled checkbox if you want your Live stream to Autoplay when someone visits your page. *NOTE: Autoplay is not guaranteed to work on all devices and browsers.*
You are also able to upload a Poster image that will be displayed in the player window when the stream is not playing. Click on the Select in the bottom right of the image field. This will open a window that will allow you to navigate and locate the file on the computer you are currently using. We recommend making the image the same size of the Stream Resolution that you chose earlier.
Click Save at the bottom when finished

Device Configuration Next we will create the Devices for the Encoder and for the Stream. Navigate to Settings > Location Settings > I/O Tab > Devices

First we will create the Playback device.
Click on New
Name the Device
In the Device Function dropdown, select Playback only
In the Device Type dropdown, select Video Server
In the Device CMS dropdown, select the VIO Playback Control Module you created above
In the Device Formats dropdown, select Video Server
In Device End Action, select None
Select the File Store the Stream is allowed to play files from
Click Save when finished

Next we will create the Encoder device
Click on New
Name the Device
In the Device Function dropdown, select Record only
In the Device Type dropdown, select Video Server
In the Device CMS dropdown, select the VIO Encode Control Module you created above
In the Device Address field put in the number 1
In Device End Action, select None
In the Codec dropdown, select what format you would like to record at. We recommend h.264
The set the bitrate you would like to record at by using the slider. Most use a value of 4mb - 8mb.
Select the File Store the Stream is allowed to record to
Click Save when finished

Cablecast also has the ability to play and encode Live Network Streaming Sources. This could be very helpful to setup with your VIO Stream to utilize more Live sources. To Learn more about this feature and how to setup, follow the links below.
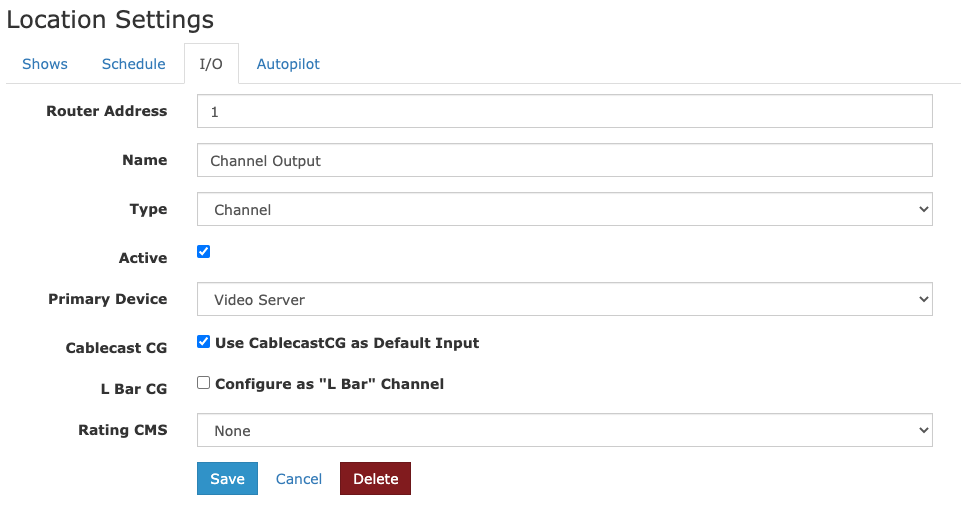
Output Configuration Now we need to set up our Channel Output. This will be what our schedule and live stream will play too. We will also be set Cablecast CG as the default source to play when there is no scheduled content playing on the channel. Navigate to Settings > Location Settings > I/O Tab > Outputs By default there will be an Output already Labeled Channel Output. Click on the Edit but to configure this.
We will leave Router Address and Type alone as they are already set for us
In Name you can either use the default name of Channel Output or can change that to something else (example: Channel 15)
In the Primary Device dropdown, select the server playback Device that we created in the previous step
To use Cablecast CG as your Default Input, click the checkbox for Cablecast CG
Click Save when finished
Part 3: Testing
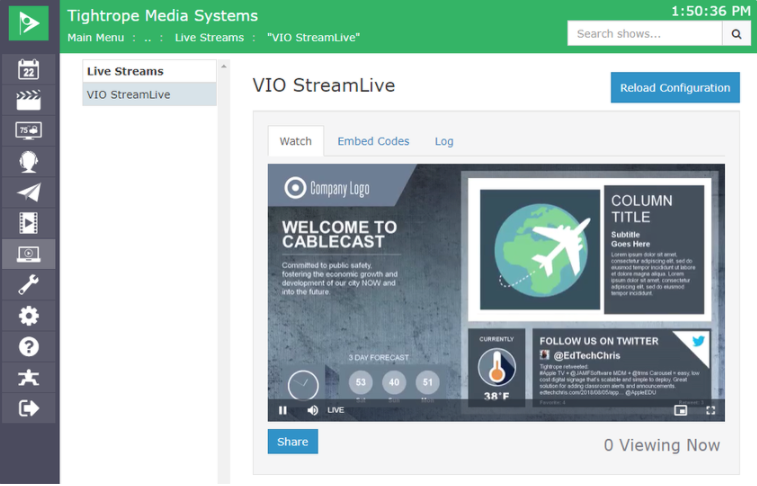
Now you can test and confirm your stream is working. To watch your stream navigate to Internet Video > Live Streams then click on the live stream you just created.
Like we mentioned before, take full advantage of Cablecast Customer Support in the initial setup and configuration of any new Cablecast system.