How to Configure Cablecast Content Monetization Services with Stripe
This article shows how to link your Stripe account through Cablecast Cloud Services, create Products in your Stripe account, and assign Stripe Products to different services in Cablecast. Paid memberships, Donations, and Paid Content Downloads all utilize Stripe to collect payments from your users.
Configure Stripe Accounts via Cablecast Cloud Services
Cablecast does not store any payment information from your users. In order to accomplish this, we have integrated Stripe payment into our Cablecast Cloud Services (CCS) platform. The following steps outline how to connect your Stripe account to CCS.
Every organization starts in Test Mode, meaning you can utilize Stripe's sandbox infrastructure to mimic transactions without any real money exchanging hands.
Linking Your Stripe Account Through Cablecast Cloud Services
Navigate to your Organization's CCS dashboard and click Link Account in the Stripe card to being the process.

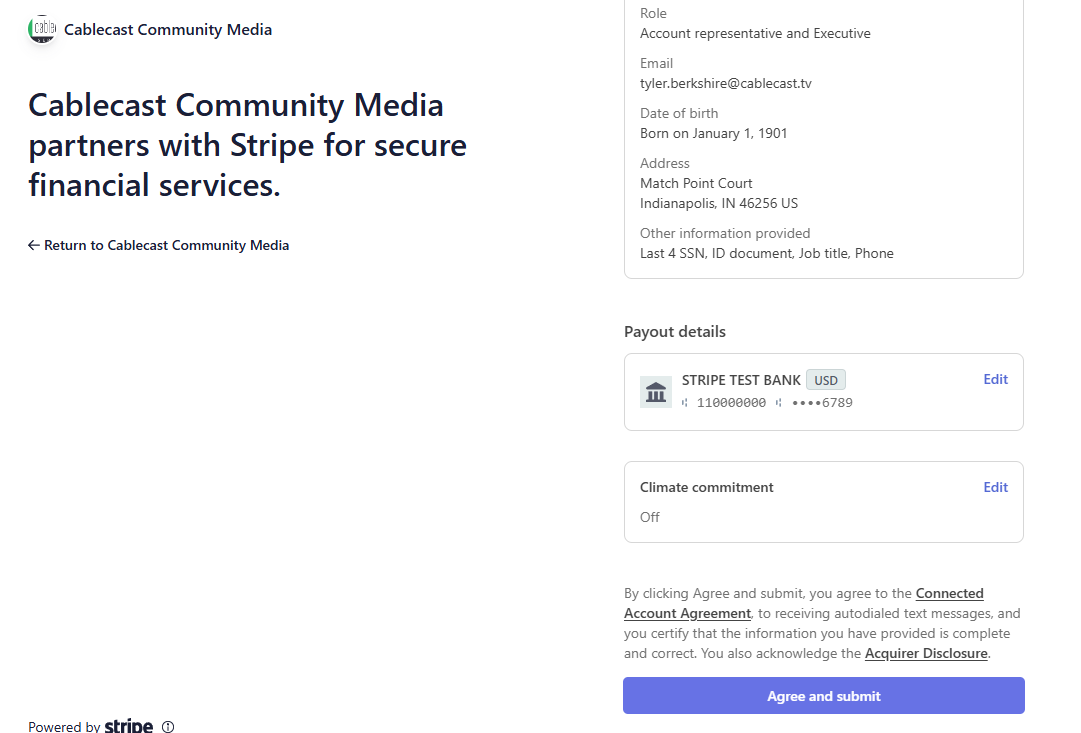
You will be redirected to Stripe's verification portal. If you have a Stripe account, enter your login information here. Otherwise, create a Stripe account
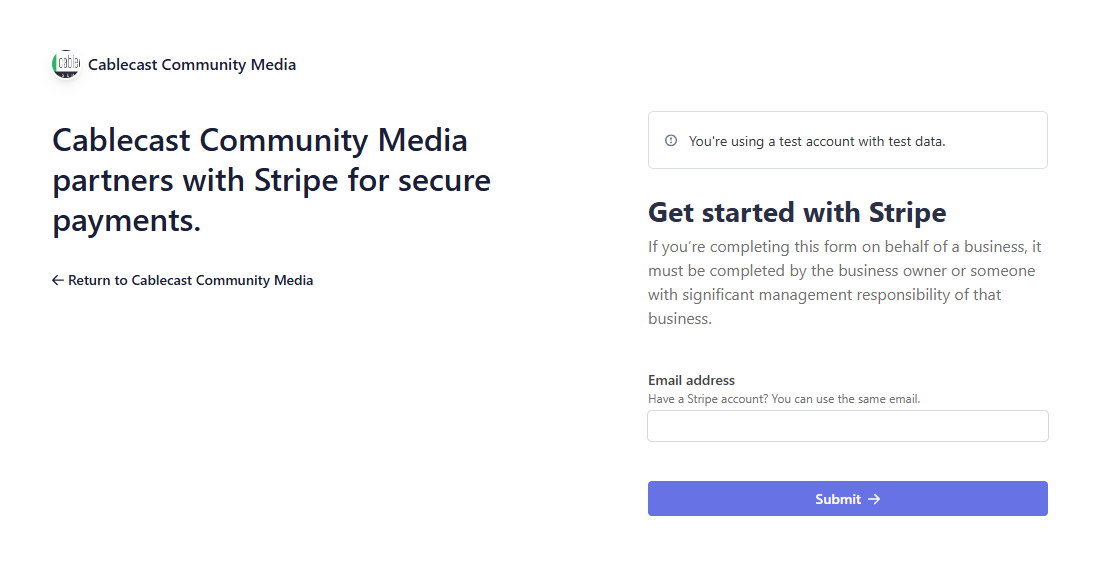
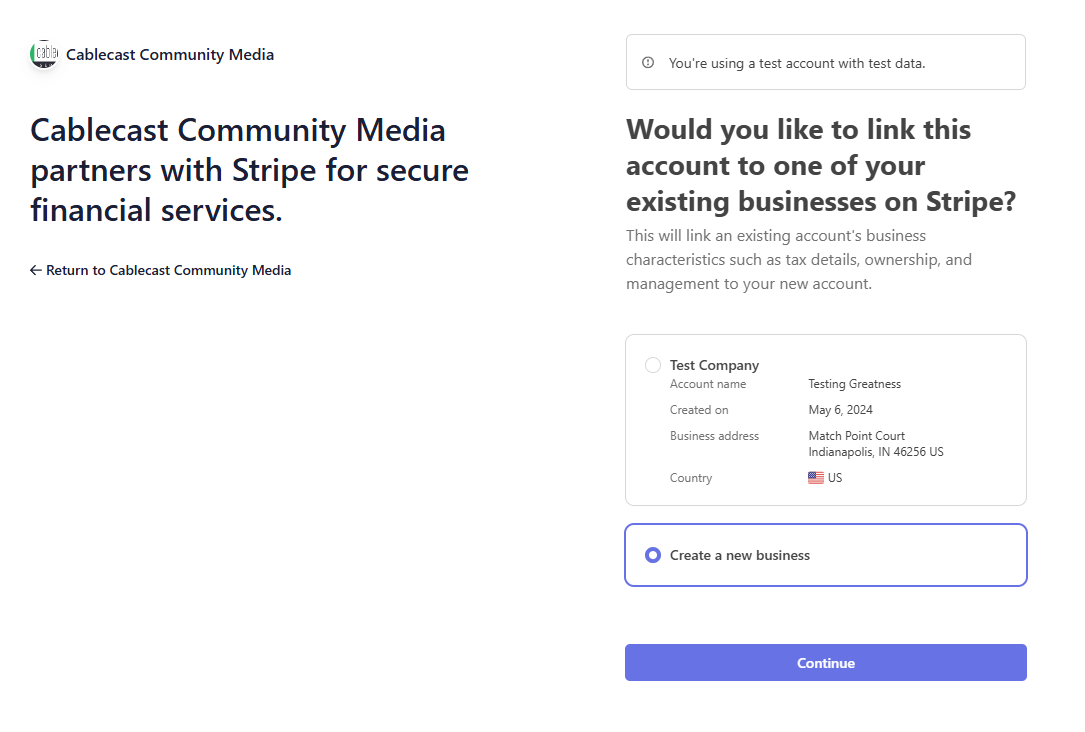
Once you have logged in to Stripe, select which business users will receive payments. If you do not have an existing business verified through Stripe, create one now.
If you are creating a new business on Stripe, take a look at this article for details on what information Stripe needs to verify payments.
If you need more time to collect this information, feel free to come back later. Simply click on the button in the Stripe card of you Organization's CCS dashboard to continue where you left off.
After entering and reviewing your business information, click Agree and Submit. This tells Stripe your account is ready for review.
New Business Payment Approval
When verifying a new business with Stripe, it can take up to 24 hours for payments to be enabled on your account. Click 'View Dashboard' from your Stripe CCS card to see the status of your account.
If you linked a pre-approved Stripe business, you'll be redirected back to CCS
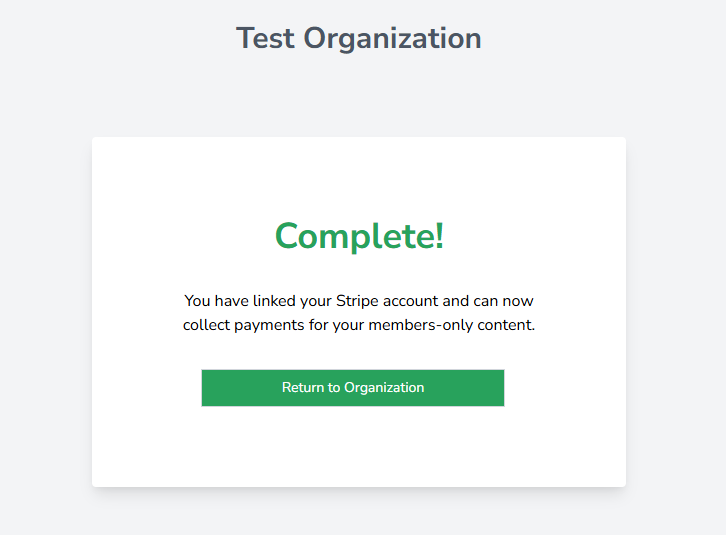
You can then click on View Dashboard from the Stripe card on your Organization's CCS overview to get redirected to your Stripe account dashboard. We will use the Stripe Dashboard later to create Products for use in Cablecast.

Once you are ready to start receiving real payments, you can link your account to the Live service. The steps to link an account to the Test and Live services are the same. You can hit the "Switch to Live" button once payments are enabled on the linked Live account. You may switch back to Test Mode at any time.

Configure Cablecast Paid Members
Navigate to Internet Video > Manage Member Access
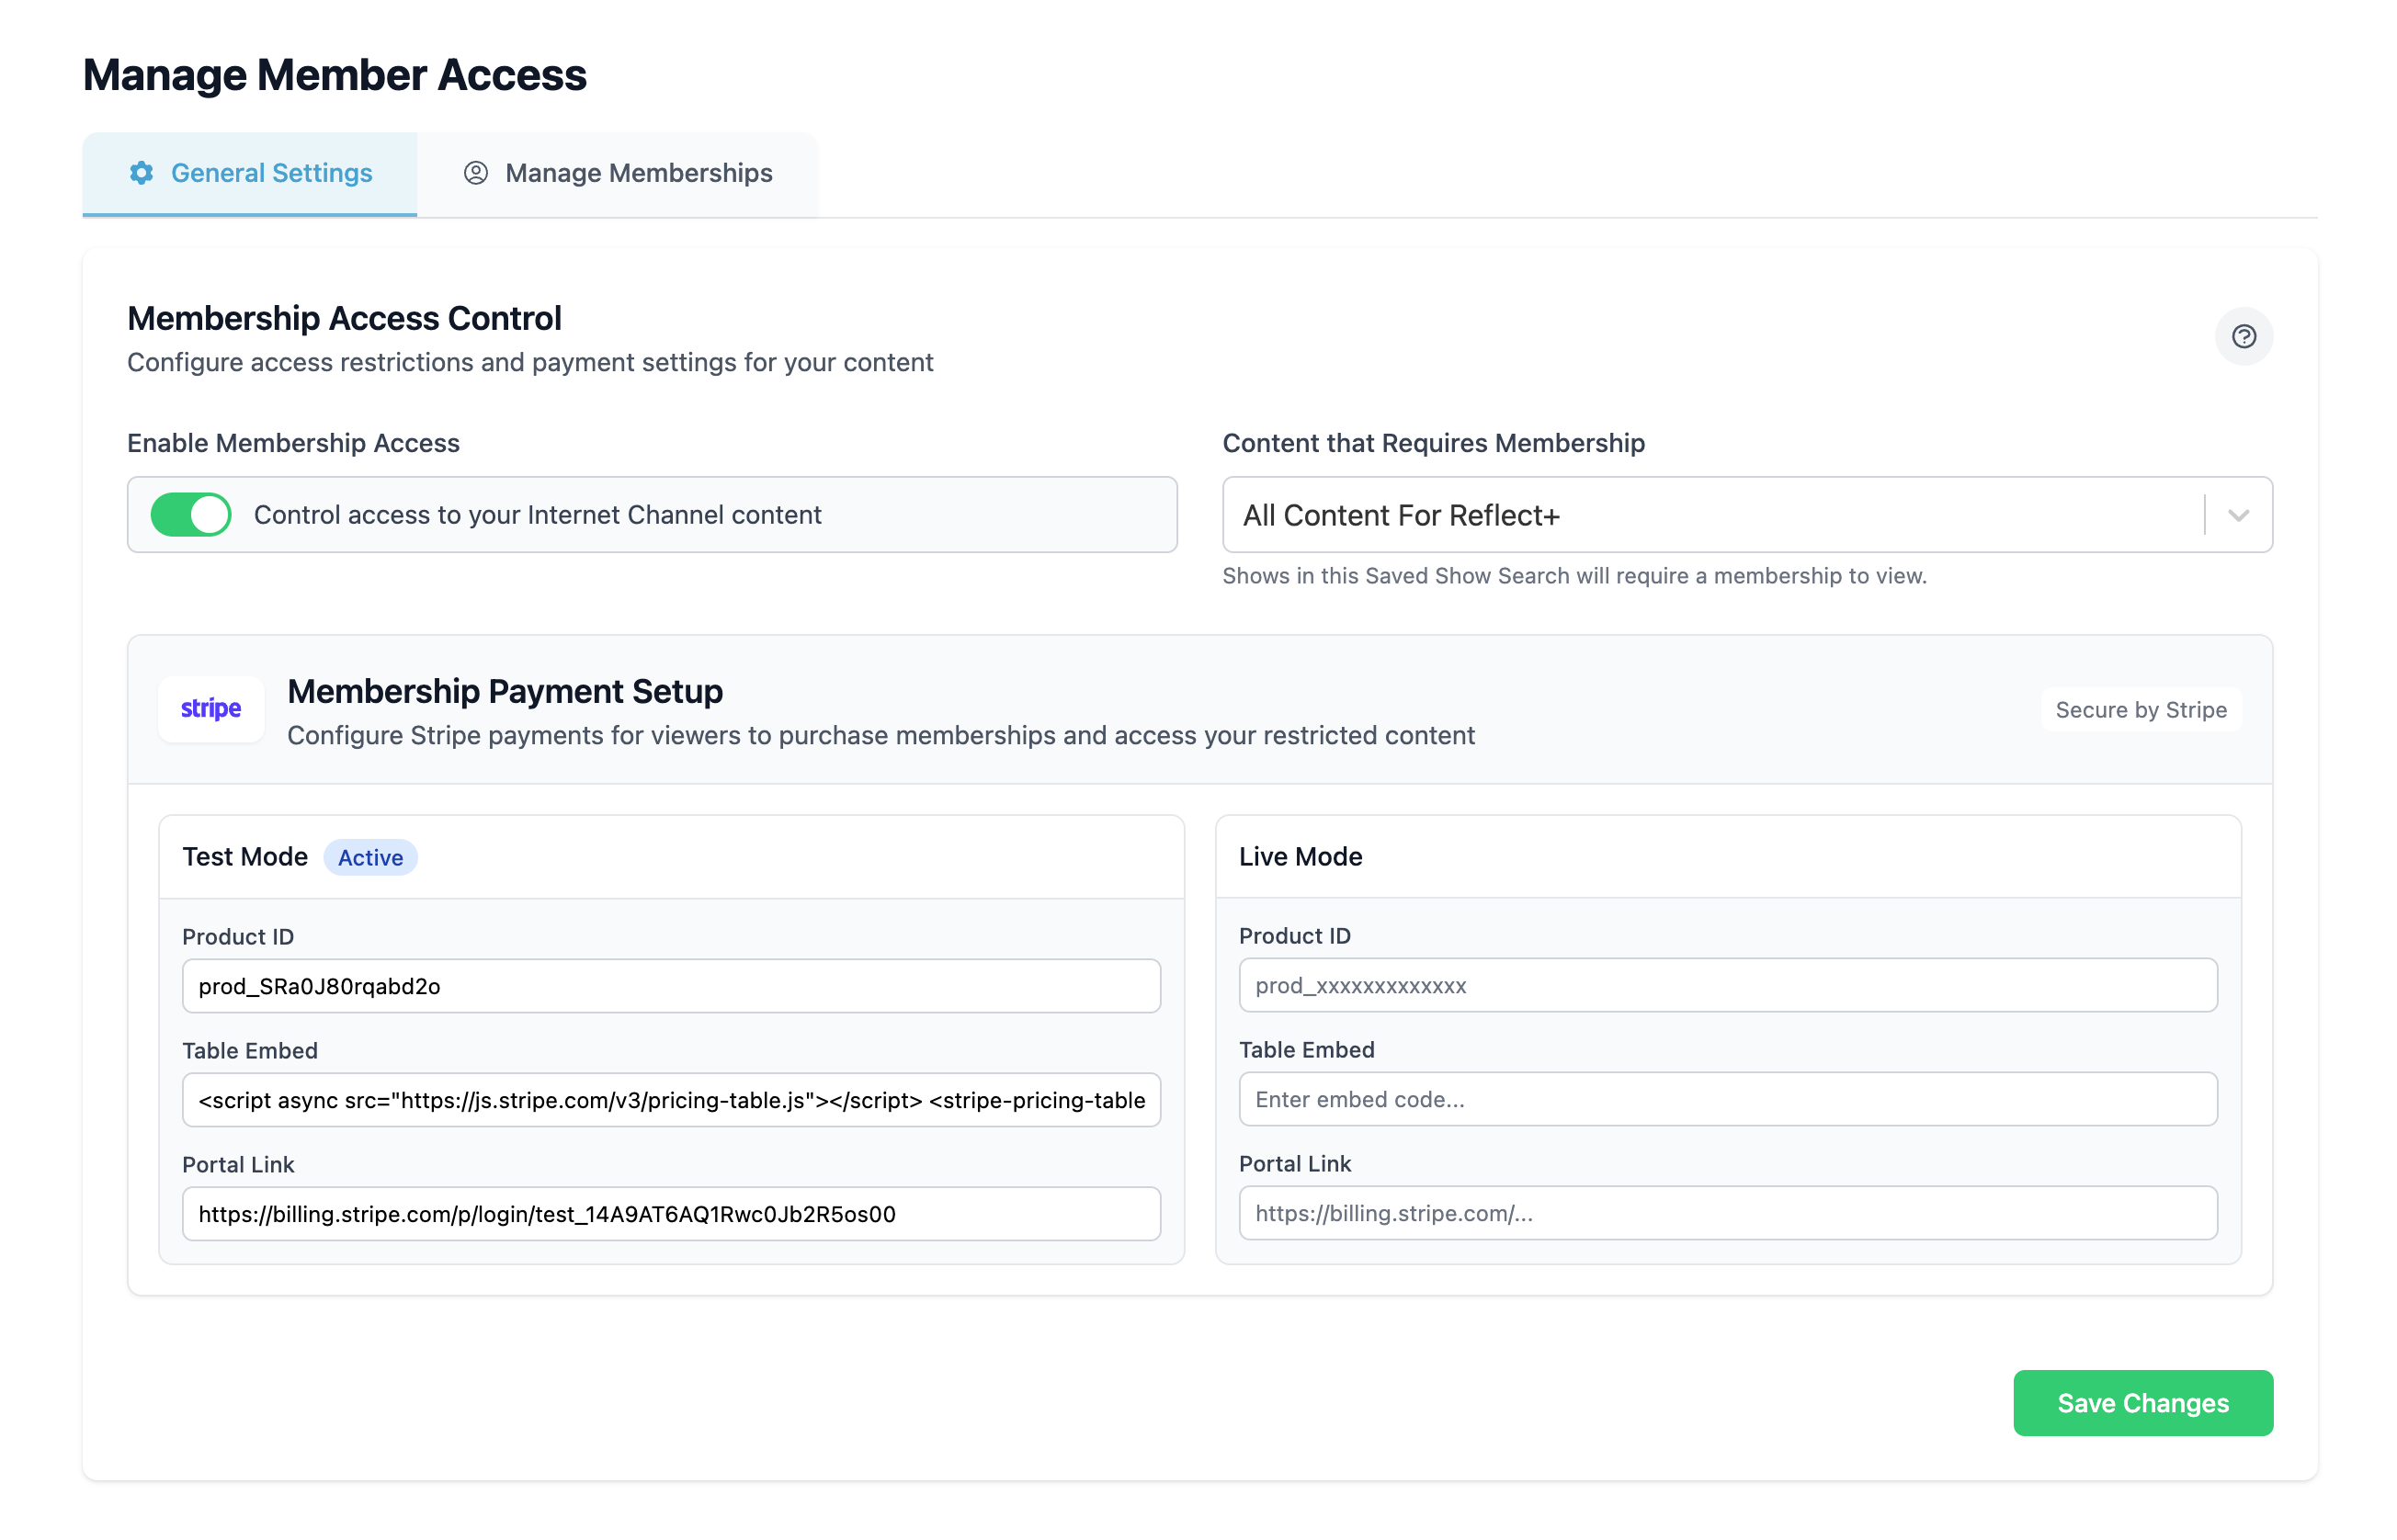
This configuration allows for users to purchase a membership to view your restricted content. The Enable Membership Access toggle and your Content that Requires Membership are all that is needed to restrict your content to members you have created manually. Read this article to learn more about manual member creation and member access settings.
Cablecast needs the Product ID, Table Embed, and Portal Link from your Membership Product in order to send paying members to Stripe for checkout.
Prerequisites
Allowing users to pay for memberships through Stripe requires the following:
Linked Stripe Account in CCS
A Software Assurance package at the Gold or greater level. Learn more here.
An active Reflect or Reflect+ subscription. Learn more here.
Creating a Stripe Membership Product
We need to create a Membership Product in Stripe for your users to purchase. Then, we'll need to copy some Stripe information over to Cablecast.
Navigate to your Stripe Account Dashboard
On the left panel, choose "Product Catalog"
Hit "Create Product"
Fill out the Product form. You can enter a name, description, and attach a logo. Configure the payment details in the lower half of the form. We recommend a Monthly/Yearly recurring payment.
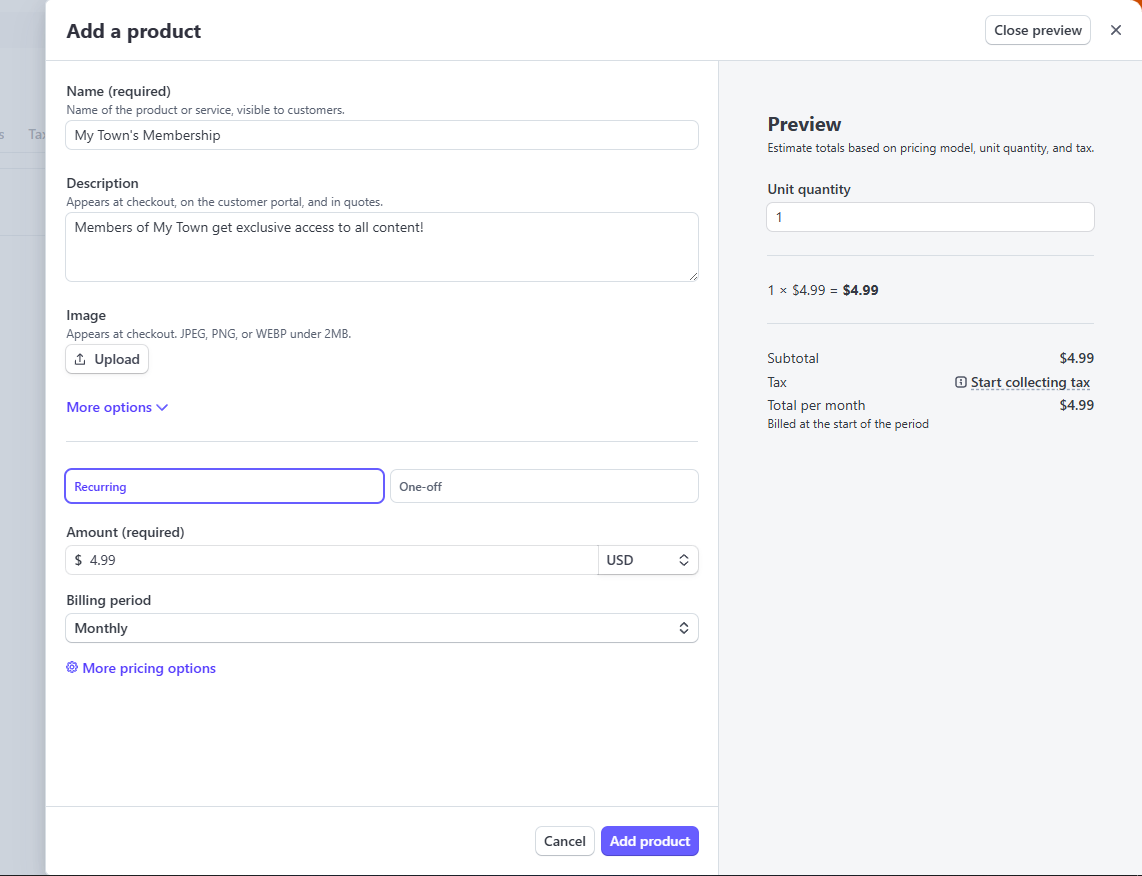
Hit "Add Product", then select it from your Product Catalog list.
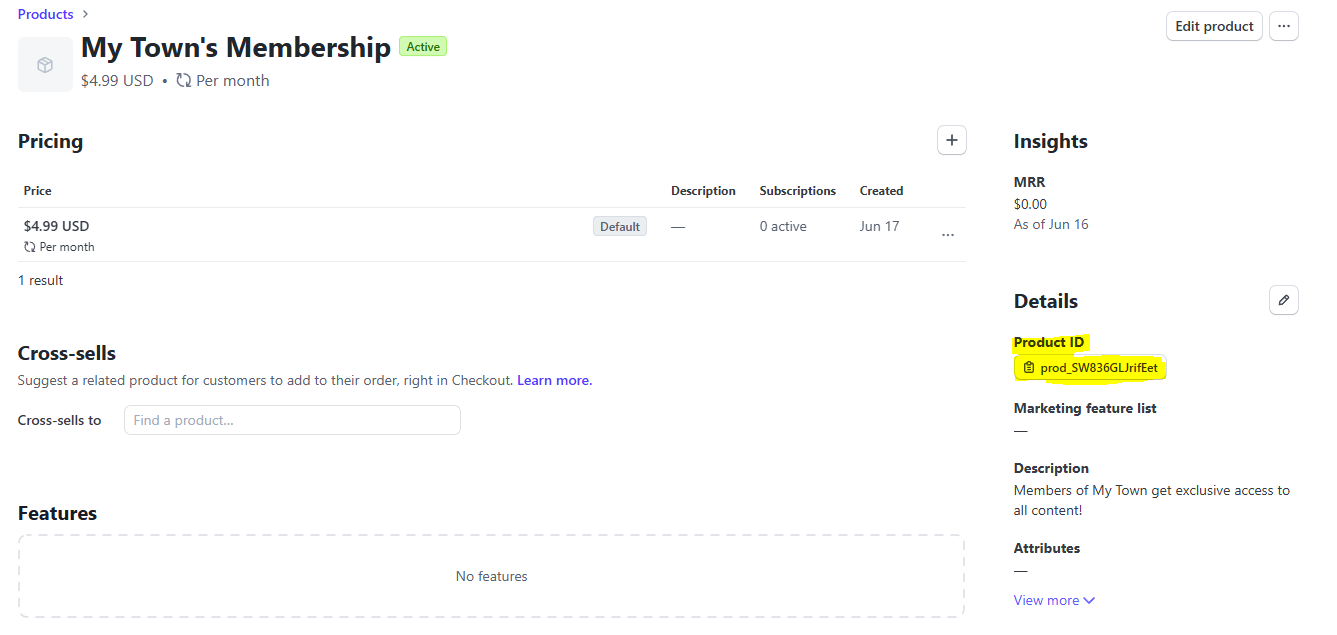
The first piece of info Cablecast needs from Stripe is the Stripe Membership Product Id. Copy the Product Id highlighted below, and save it for later.
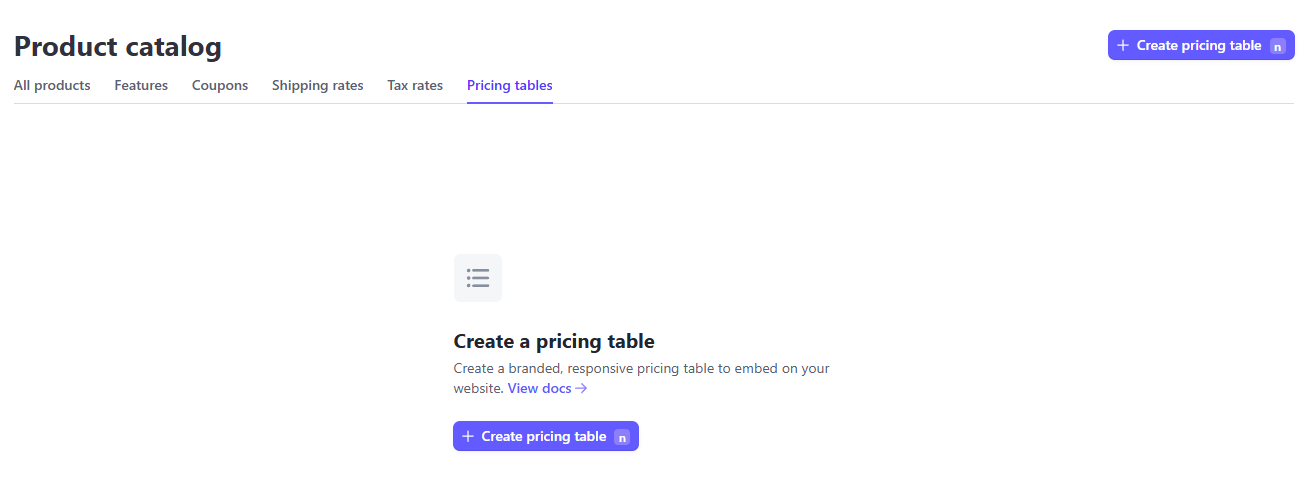
Next, return to the Product Catalog page and select the Pricing Tables tab.
Hit "Create Pricing Table".
This form lets you customize the checkout window customers will see when purchasing a membership. Be sure to select the product we just created from the search bar. Make any styling adjustments you would like, then hit "Continue".
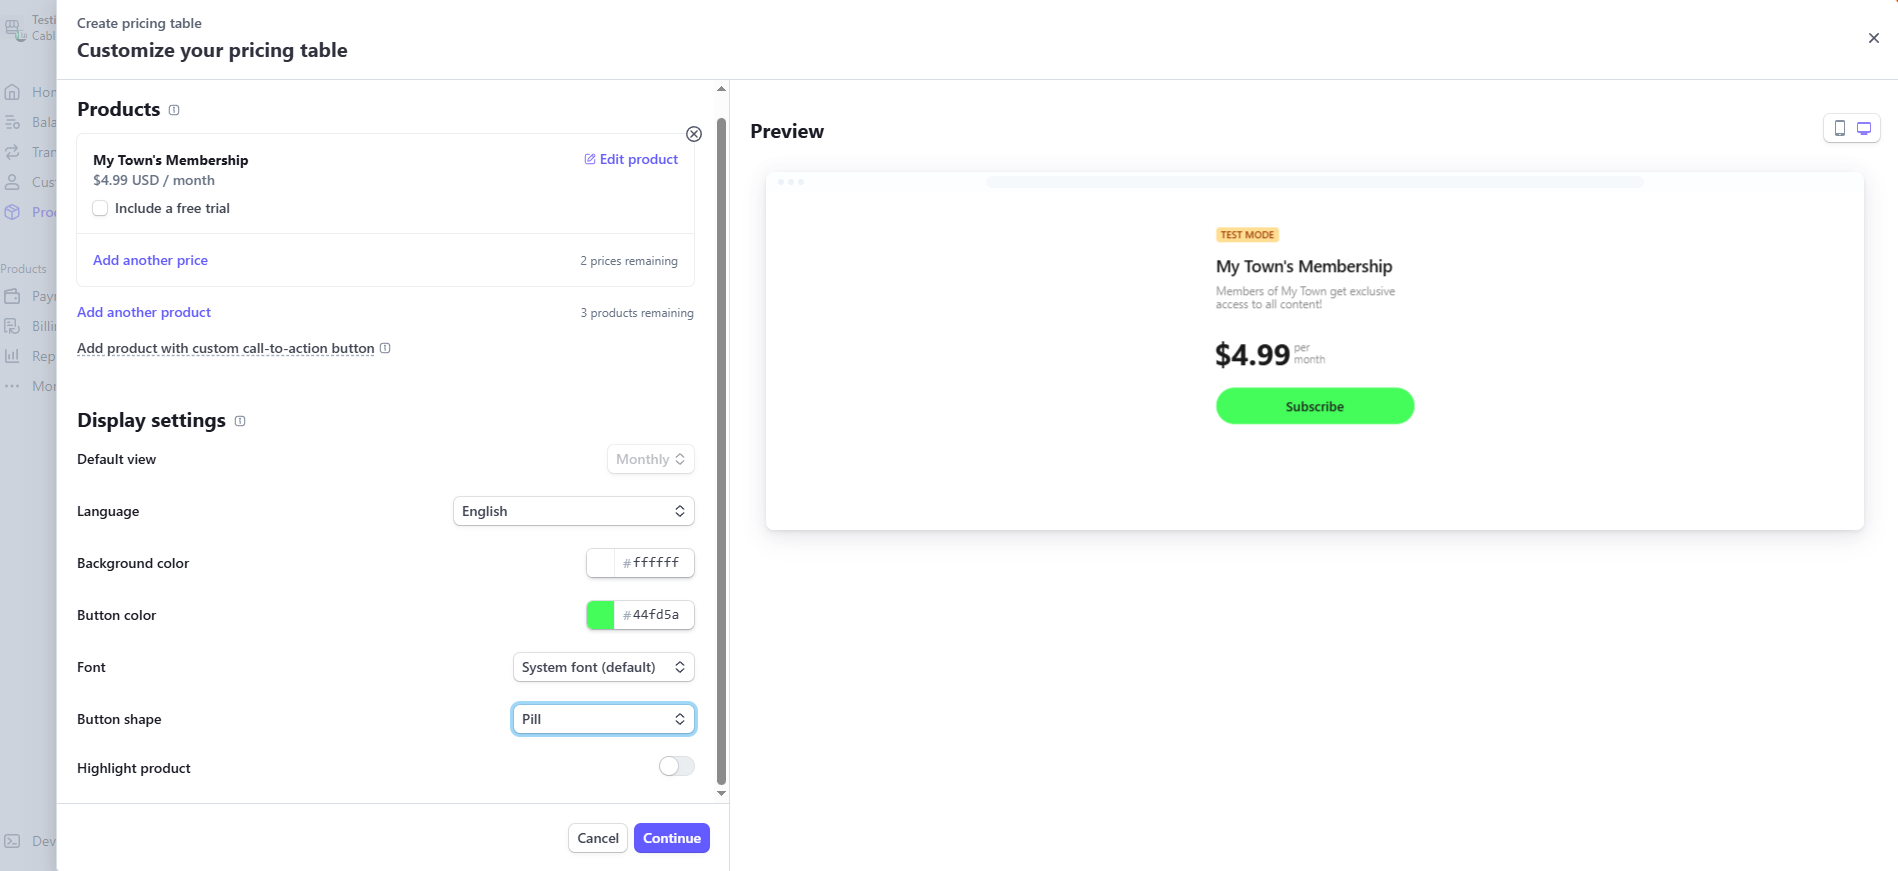
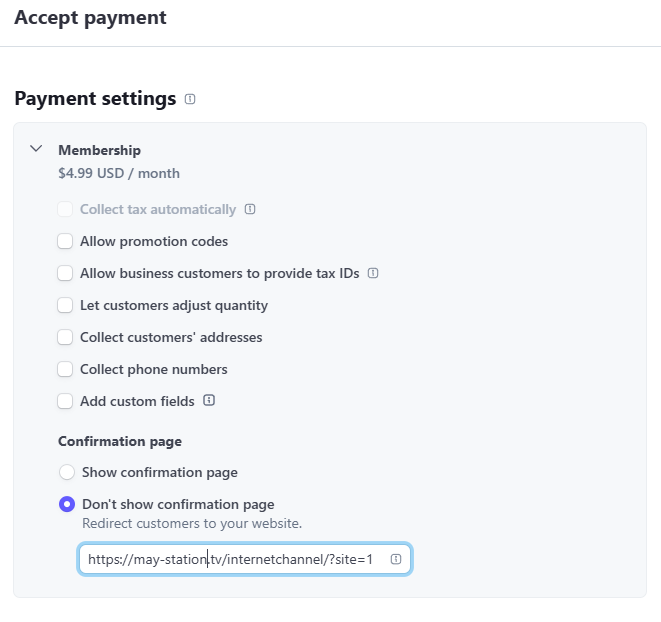
Here you can configure extra information to collect during the checkout and set a confirmation message to display. Or, you can set a return URL customers will be redirected to after they checkout. These are optional.
Here you can attach more products to your table, giving customers the ability to change into different subscription tiers. This is optional and Cablecast does not take subscription tiers into consideration when gating content to members.
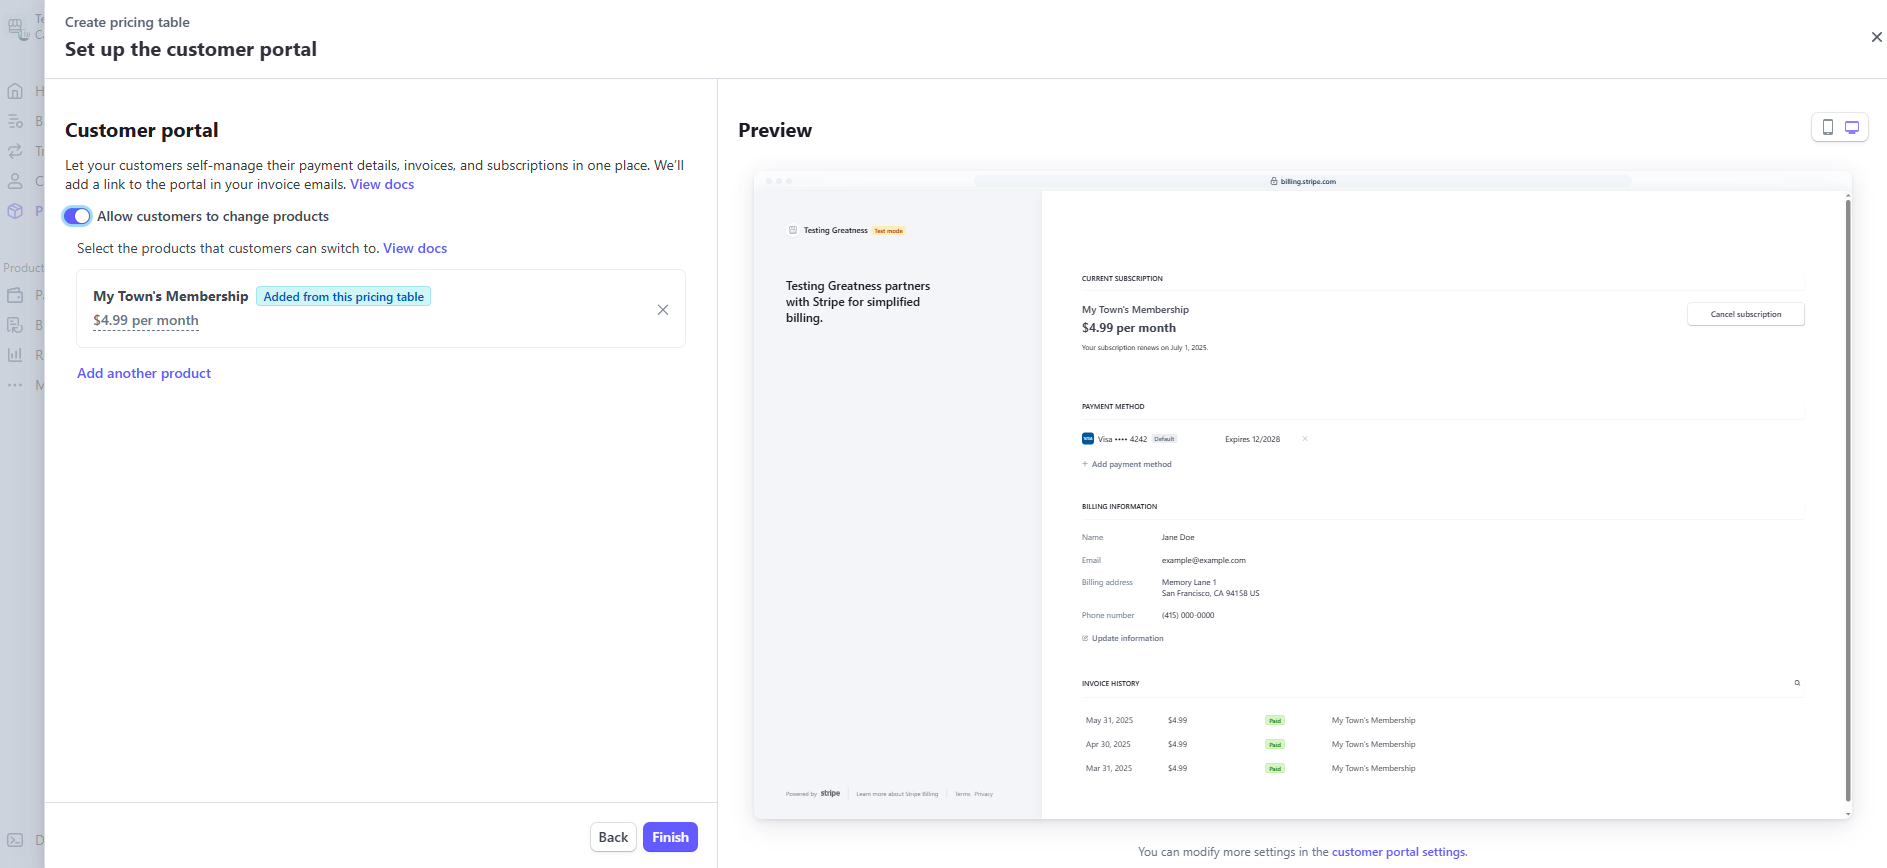
Hit "Finish". You will be redirected your new Product Table's page. Here is where we will collect the final two pieces of information Cablecast needs.
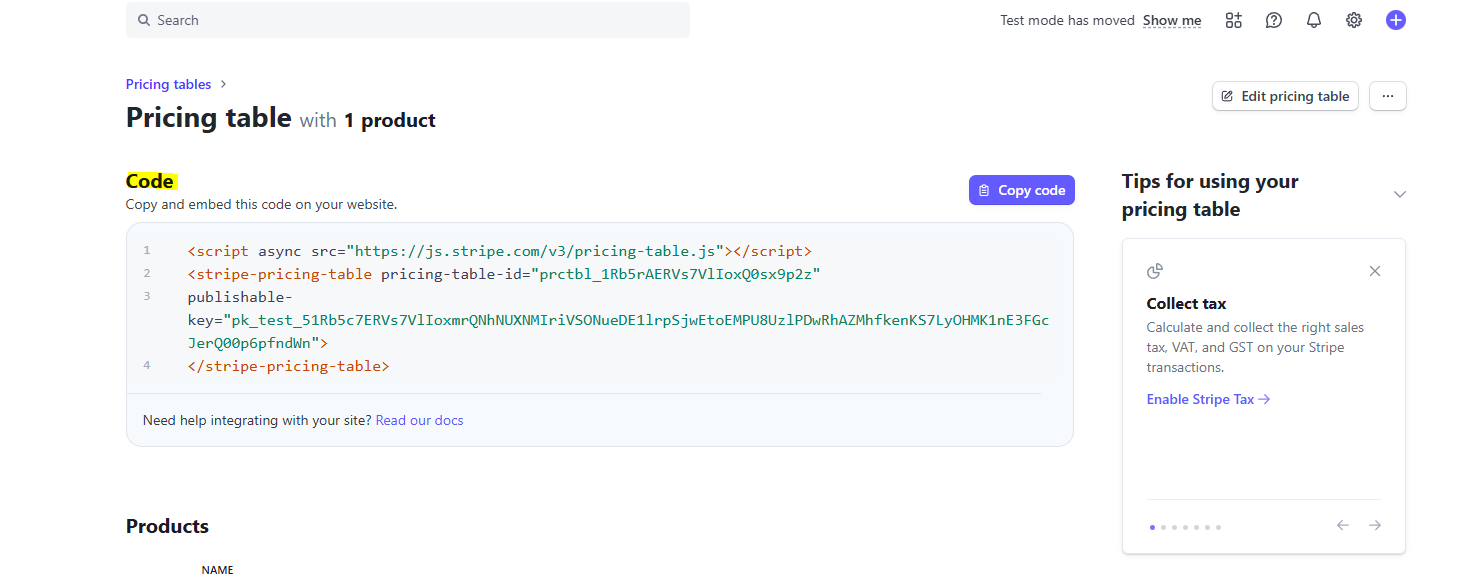
Copy the Product Table Embed Code and save it for later. Use the "Copy Code" button for an easy copy to clipboard.
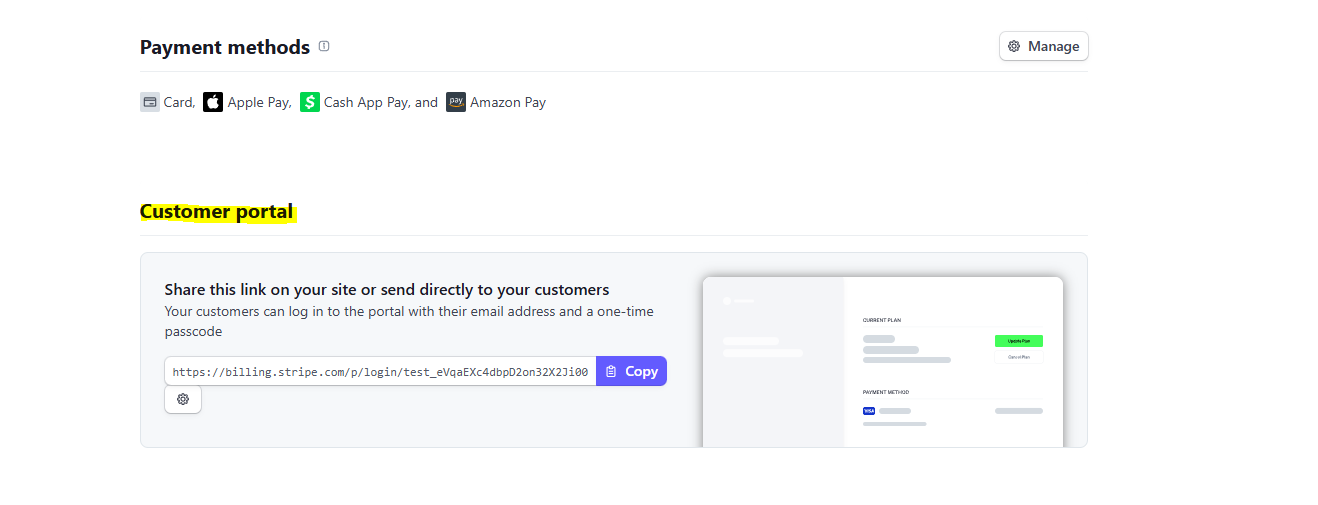
Scroll down to the bottom of this page and look for the section titled Customer Portal. Hit "Copy" to save the Customer Portal Link.
Now you can head back to Cablecast and navigate to Internet Video > Manage Member Access
Paste the information we copied from Stripe into the remaining form fields. Ensure you fill out the currently active mode's fields. Cablecast will save all fields in case you wish to switch between the Test and Live services.
Product Id: starts with prod_
Table Embed: starts with <script>
Portal Link: starts with https://billing.stripe.com
Hit "Save".
Refer to this article for how to enable Membership Restrictions on your Internet Channel. Once enabled, users will be able to purchase a membership to view your restricted content!
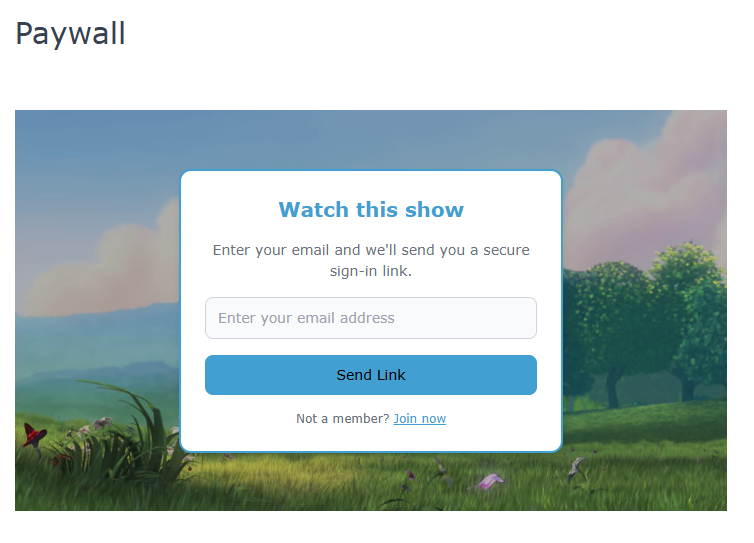
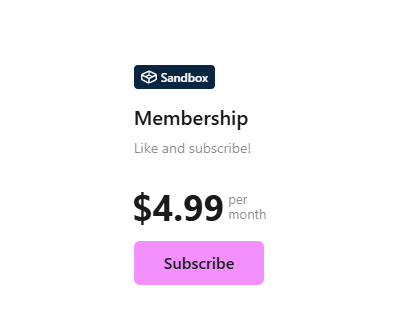
This is what paying for a membership looks like for your users. After checkout, they can sign in to view the show.
Configure Donation Links
Navigate to Internet Video > Internet Channels > Edit > Monetization Tab
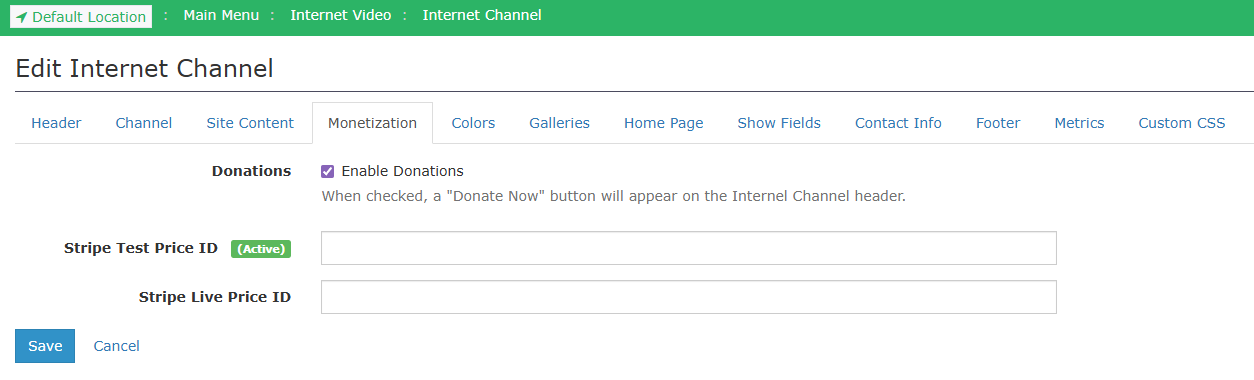
These settings allow for your Internet Channels to have a "Donate Now" button in the channel's header. When users click on this, they will be redirected a Stripe Checkout Session where they can donate a custom amount.
Prerequisites
Allowing users to donate through your Internet Channel requires the following:
Linked Stripe Account in CCS
A Software Assurance package at the Gold or greater level. Learn more here.
Creating a Stripe Donation Link
Once you hit "Enable Donations", fields for a Stripe Price ID will appear. We need to create a Donation Product and Price in Stripe, and copy the Price ID here.
Navigate to your Stripe Account Dashboard.
On the left panel, choose "Product Catalog".
Hit "Create Product".
Fill out the Product Form. You can enter a name, description, and attach a logo. Set the type to "One-off". Leave the price blank for now.
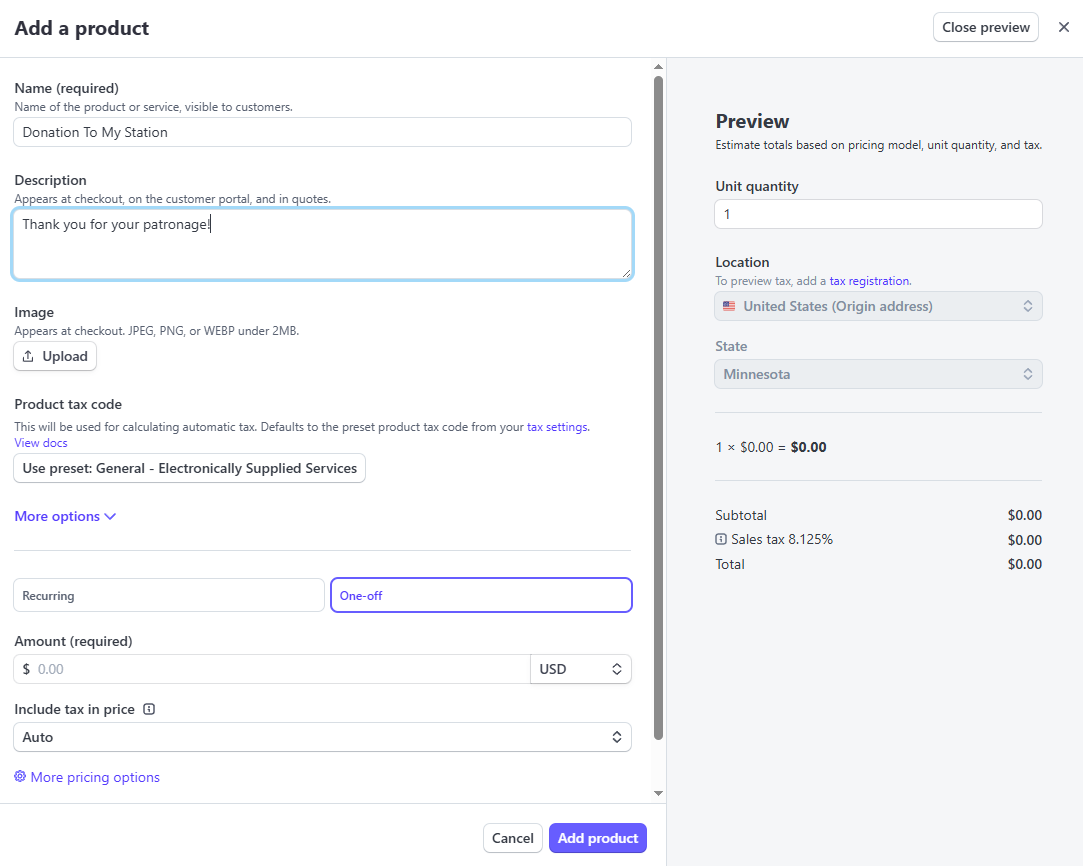
Hit "More pricing options" in the bottom left of the form. A new form will appear on top of your Product form.
Choose the "Customer chooses price" pricing model.
Optionally, you may set a suggested amount and/or set an upper and lower limit to the amount customers may donate.
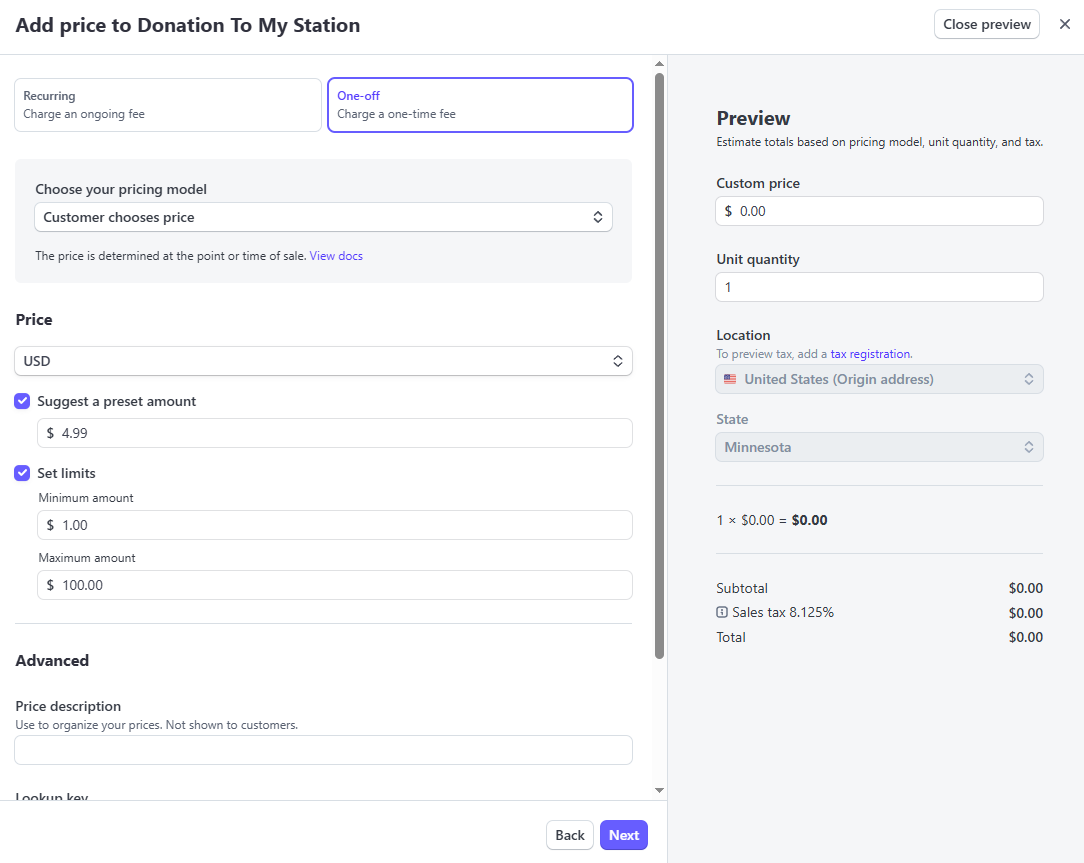
Click "Next". You will see your Product form again, with your created Price attached to it.
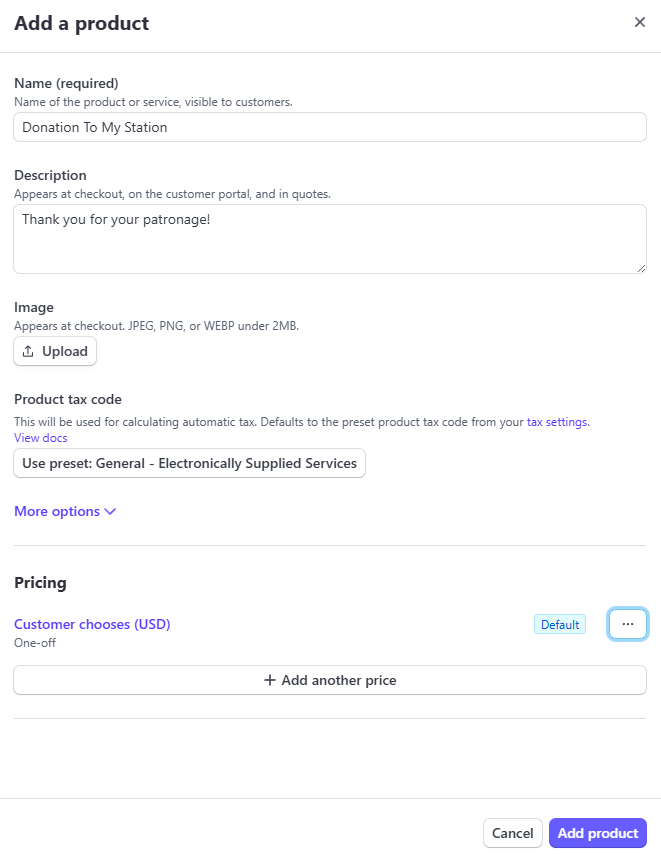
Hit "Add Product". You will be redirected back to your Product Catalog.
Select the Product you just created.
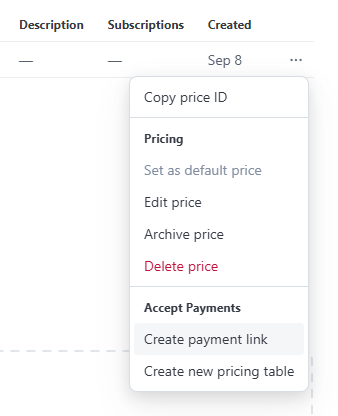
From the "Pricing" section, hit the ellipses next to your Price and hit "Copy Price ID".
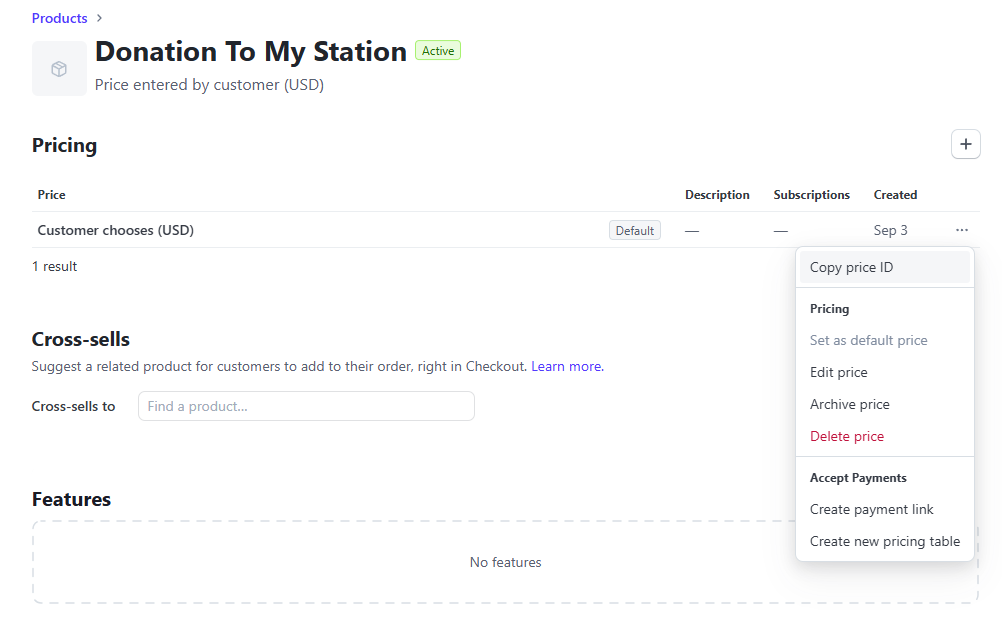
Save this value for the next step.
Lastly, we need to create a Payment Link for this Stripe Product. Hit "Create Payment Link" from the same ellipses dropdown.
The Payment Link Form will be filled in with the same settings you configured for your Donation Product. DO NOT change any values here, or Cablecast will not be able to locate the correct Donation Product.
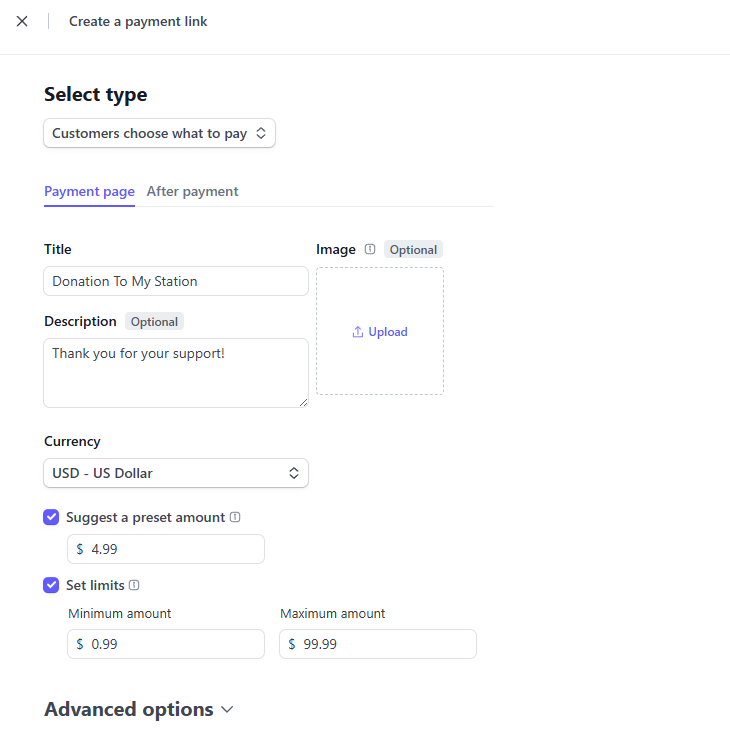
Hit the "After Payment" tab to show some optional settings. We recommend Redirecting your users back to the Internet Channel after they checkout.
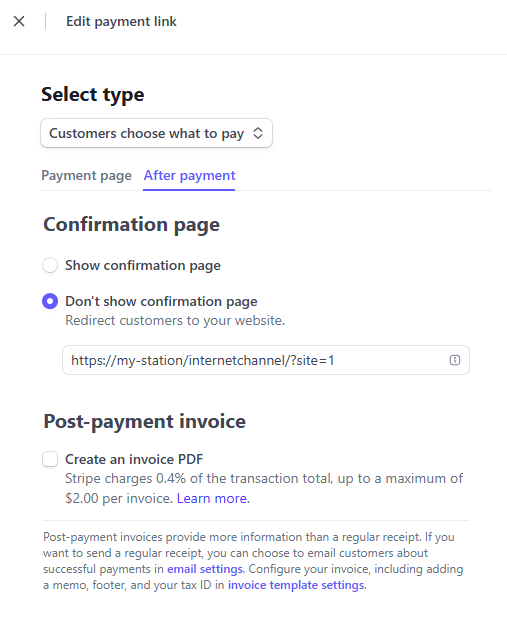
Hit "Create Link" and head back to Cablecast.
Enable Donations on the Internet Channel
Back in Cablecast, navigate to Internet Video > Internet Channels > Edit -> Monetization Tab
Hit "Enable Donations"
Paste your Stripe Price ID into the form field corresponding to your active service mode. Cablecast will save all fields in case you wish to switch between the Test and Live services.
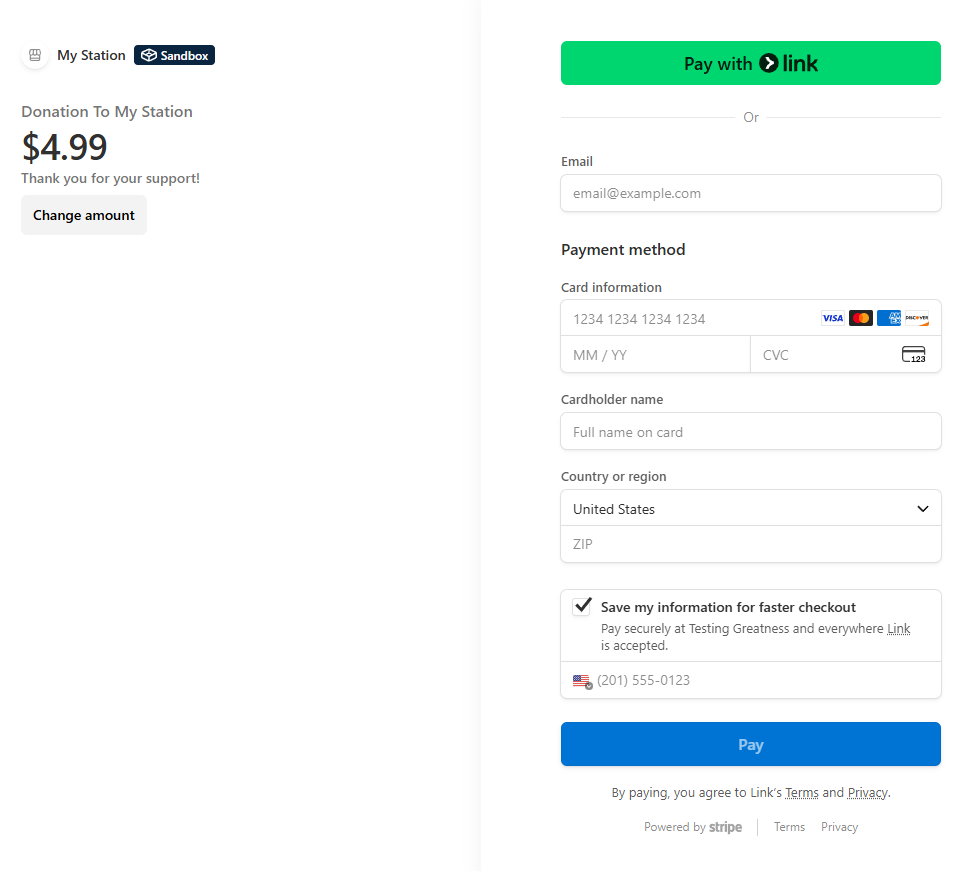
Now your Internet Channel has Donations enabled! Users can click on the "Donate" button in your Internet Channel header to donate.

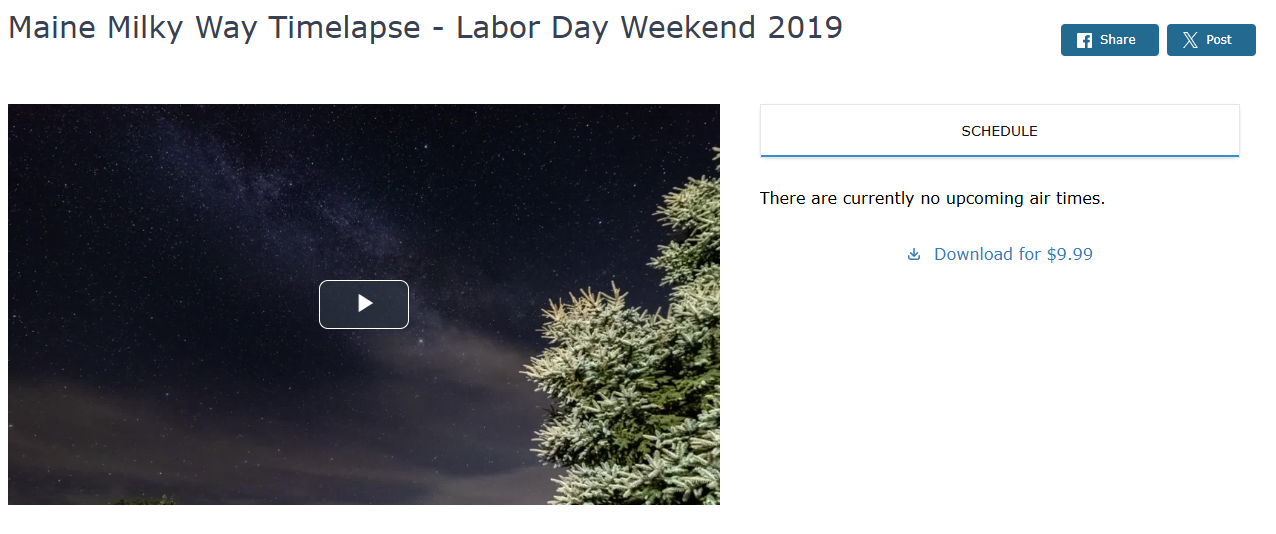
Configure Pay to Download Content
Navigate to Internet Video > Pay to Download
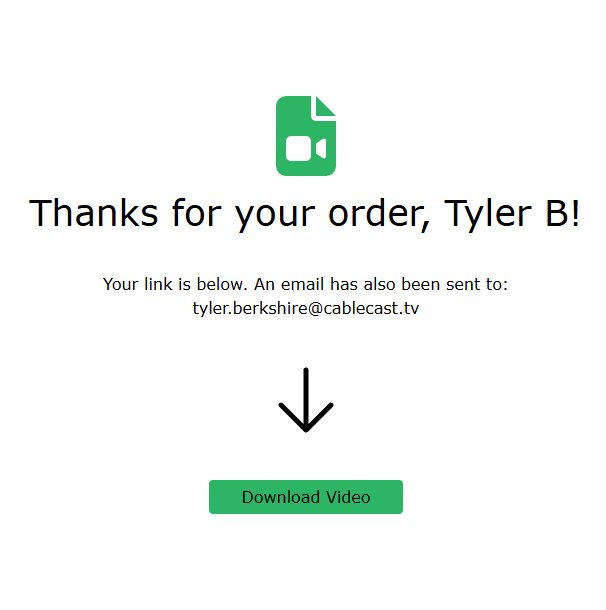
These configuration screens allows for you to give Shows the capability of being purchased for download. Once configured, Shows will have a "Download" button next to their player. Users will be redirected to Stripe for payment, and then be emailed a secure link to download the content for a limited time.
Prerequisites
Allowing users pay for downloads to your content requires the following:
Linked Stripe Account in CCS
A Software Assurance package at the Gold or greater level. Learn more here.
An active Reflect or Reflect+ subscription. Learn more here.
Creating a Stripe Product
We need to create a Pay to Download Product and Price in Stripe.
Navigate to your Stripe Account Dashboard.
On the left panel, choose "Product Catalog".
Hit "Create Product".
Fill out the Product form. You can enter a name, description, and attach a logo. Set the type to "One-off"
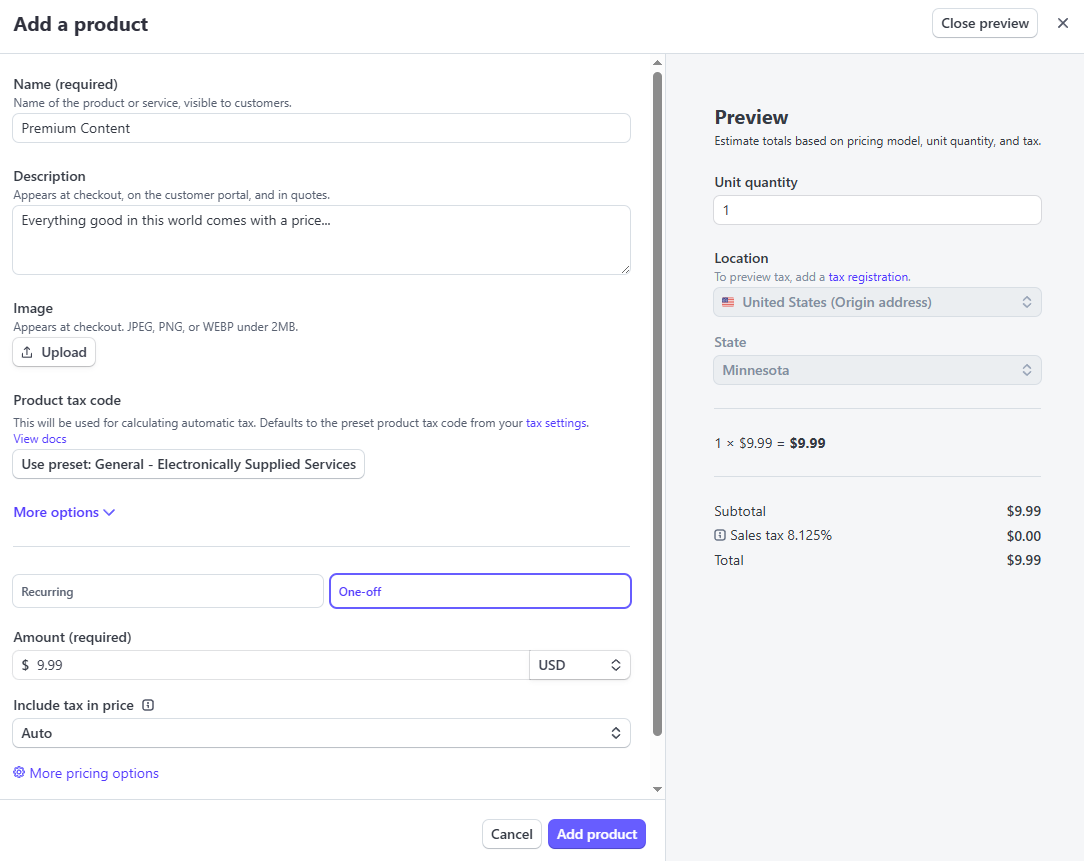
Hit "Add Product". You will be redirected back to your Product Catalog.
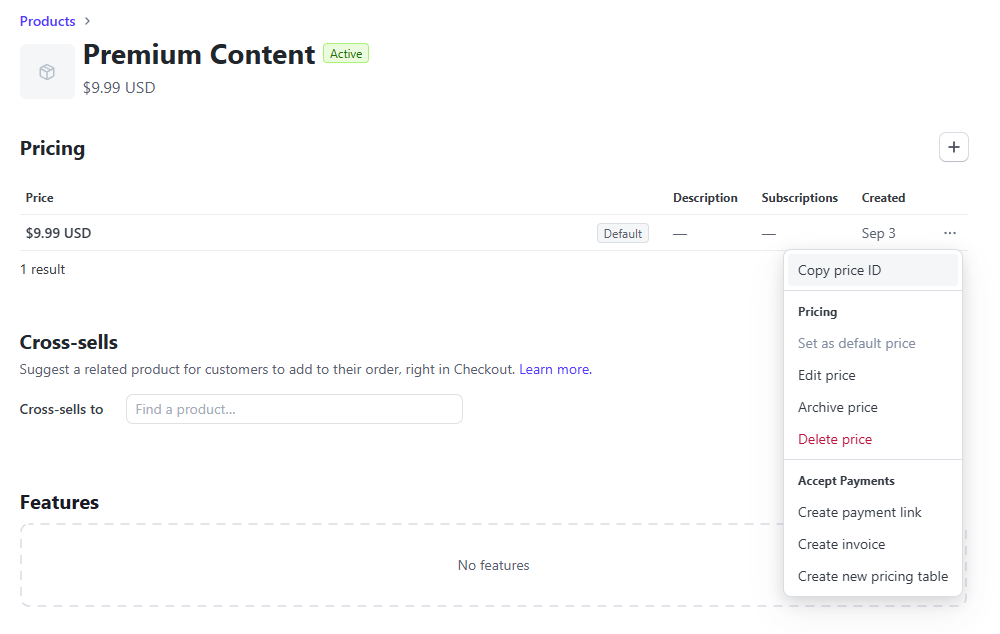
Select the Product you just created.
From the "Pricing" section, hit the ellipses next to your Price and hit "Copy Price ID". Save this value for use in Show Price creation.
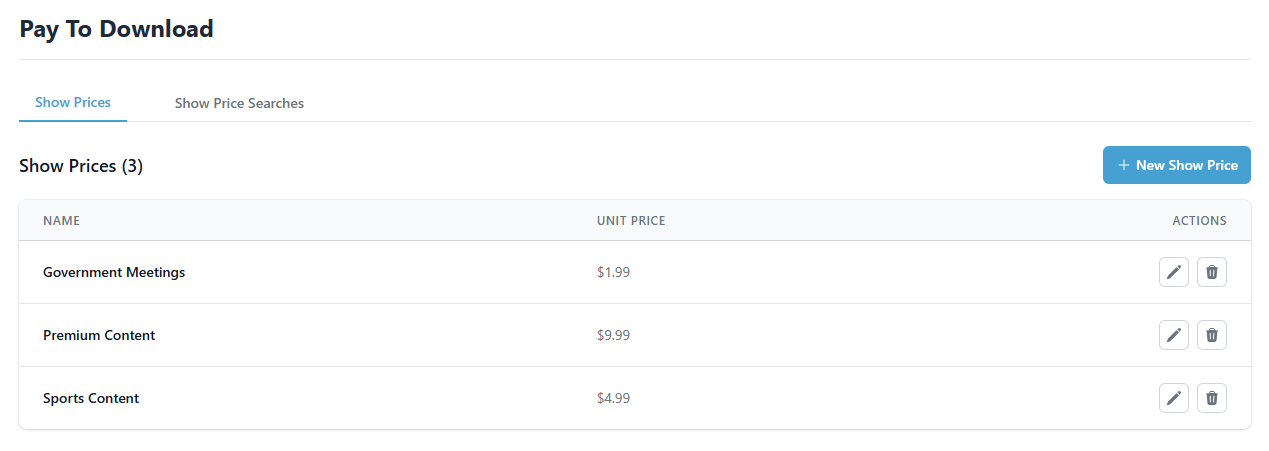
Creating Show Prices
A Show Price is essentially Cablecast's link to a Stripe Product. Let's create a Show Price for Premium Content. We'll use the Stripe Product from the previous step.
Navigate to Settings > System > Pay to Download
Hit "New Show Price"
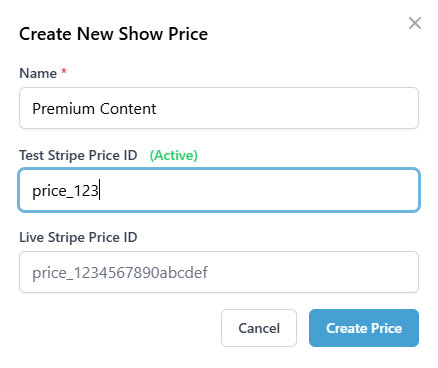
Give it a Name. Make sure it is similar or identical to the Stripe Product's name you created earlier.
Paste your Stripe Price ID into the form field corresponding to your active service mode. Cablecast will save all fields in case you wish to switch between the Test and Live services.
Hit "Create Price"
The unit amount will remain blank until Cablecast checks in with CCS to fetch the current unit amount directly from Stripe.
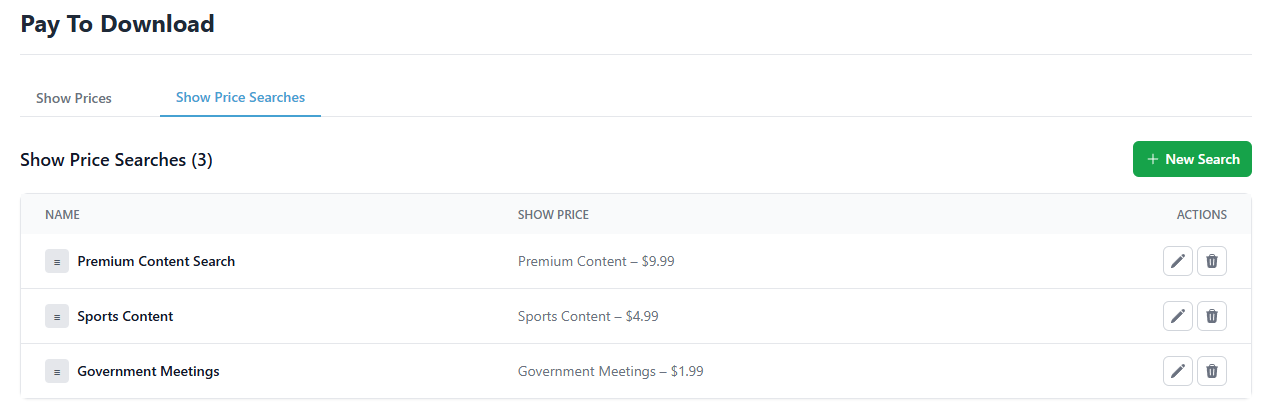
Creating Show Price Searches
A Show Price Search is Cablecast's way to link a Show Price with a Saved Show Search. Let's assign the Premium Content Show Price to a Show Price Search, so our shows can be tagged with the proper Stripe Product and display price.
Navigate to Settings > System > Pay to Download > Show Price Searches Tab
Hit "Create Your First Search"
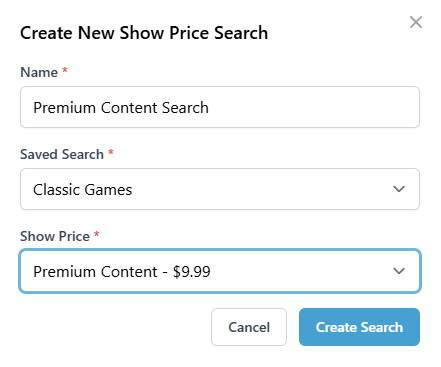
Give it a Name
Select a Saved Search
Select a Show Price
Hit "Create Search"
Show Price Searches are ordered by priority. This means if a Show falls into more than one search, it will be tagged with the Show Price from the highest priority search of which it is a member. You can drag searches up and down to reorder their priority.
Enable Pay to Download on the Internet Channel
Back in Cablecast, navigate to Internet Video > Internet Channels > Edit > Monetization Tab
Hit "Enable Pay to Download"
Now your Internet Channel is ready to distribute content to paying customers! After checkout, customers will be redirected to a download link for the show.