Getting Started With Control Rooms
Overview
Control Rooms are the successor to Cablecast's Force Matrix, giving operators purpose-built interfaces for a variety of live events. Control Rooms allow a Cablecast Administrator to:
Build streamlined control interfaces customized for different types of events. Control Rooms load only the devices and channel outputs required for an event, eliminating clutter.
Create Macros that enable operators to perform complex series of actions in one click — start or end a meeting the right way, every time.
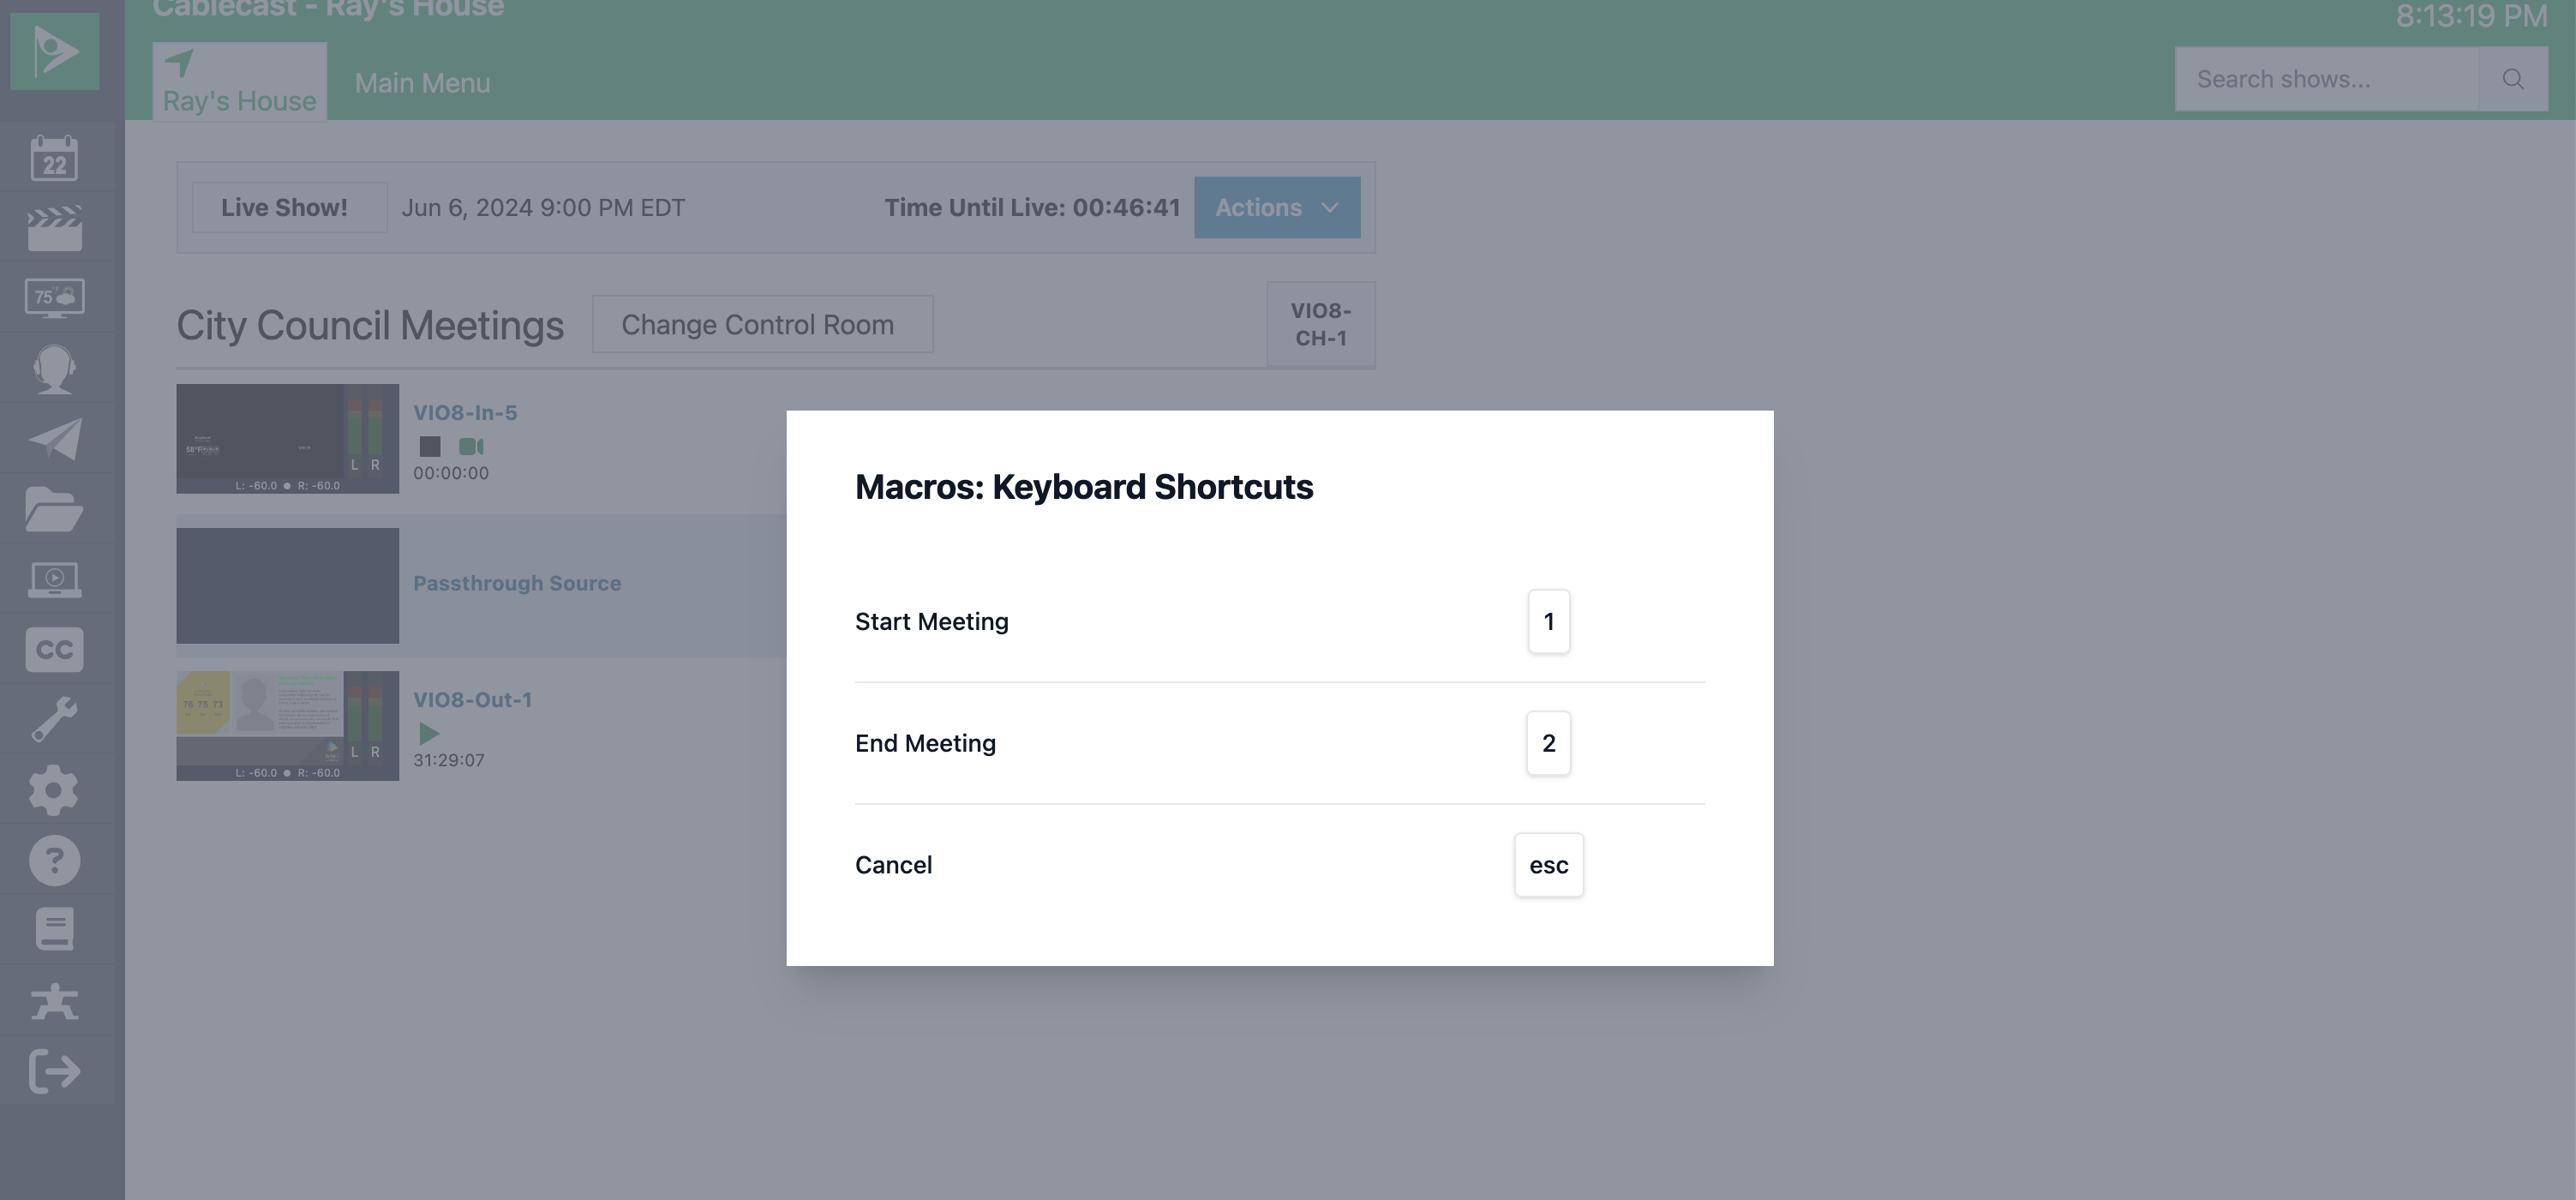
Define custom Hotkeys to trigger Macros with minimal keyboard strokes.
Anatomy of a Control Room
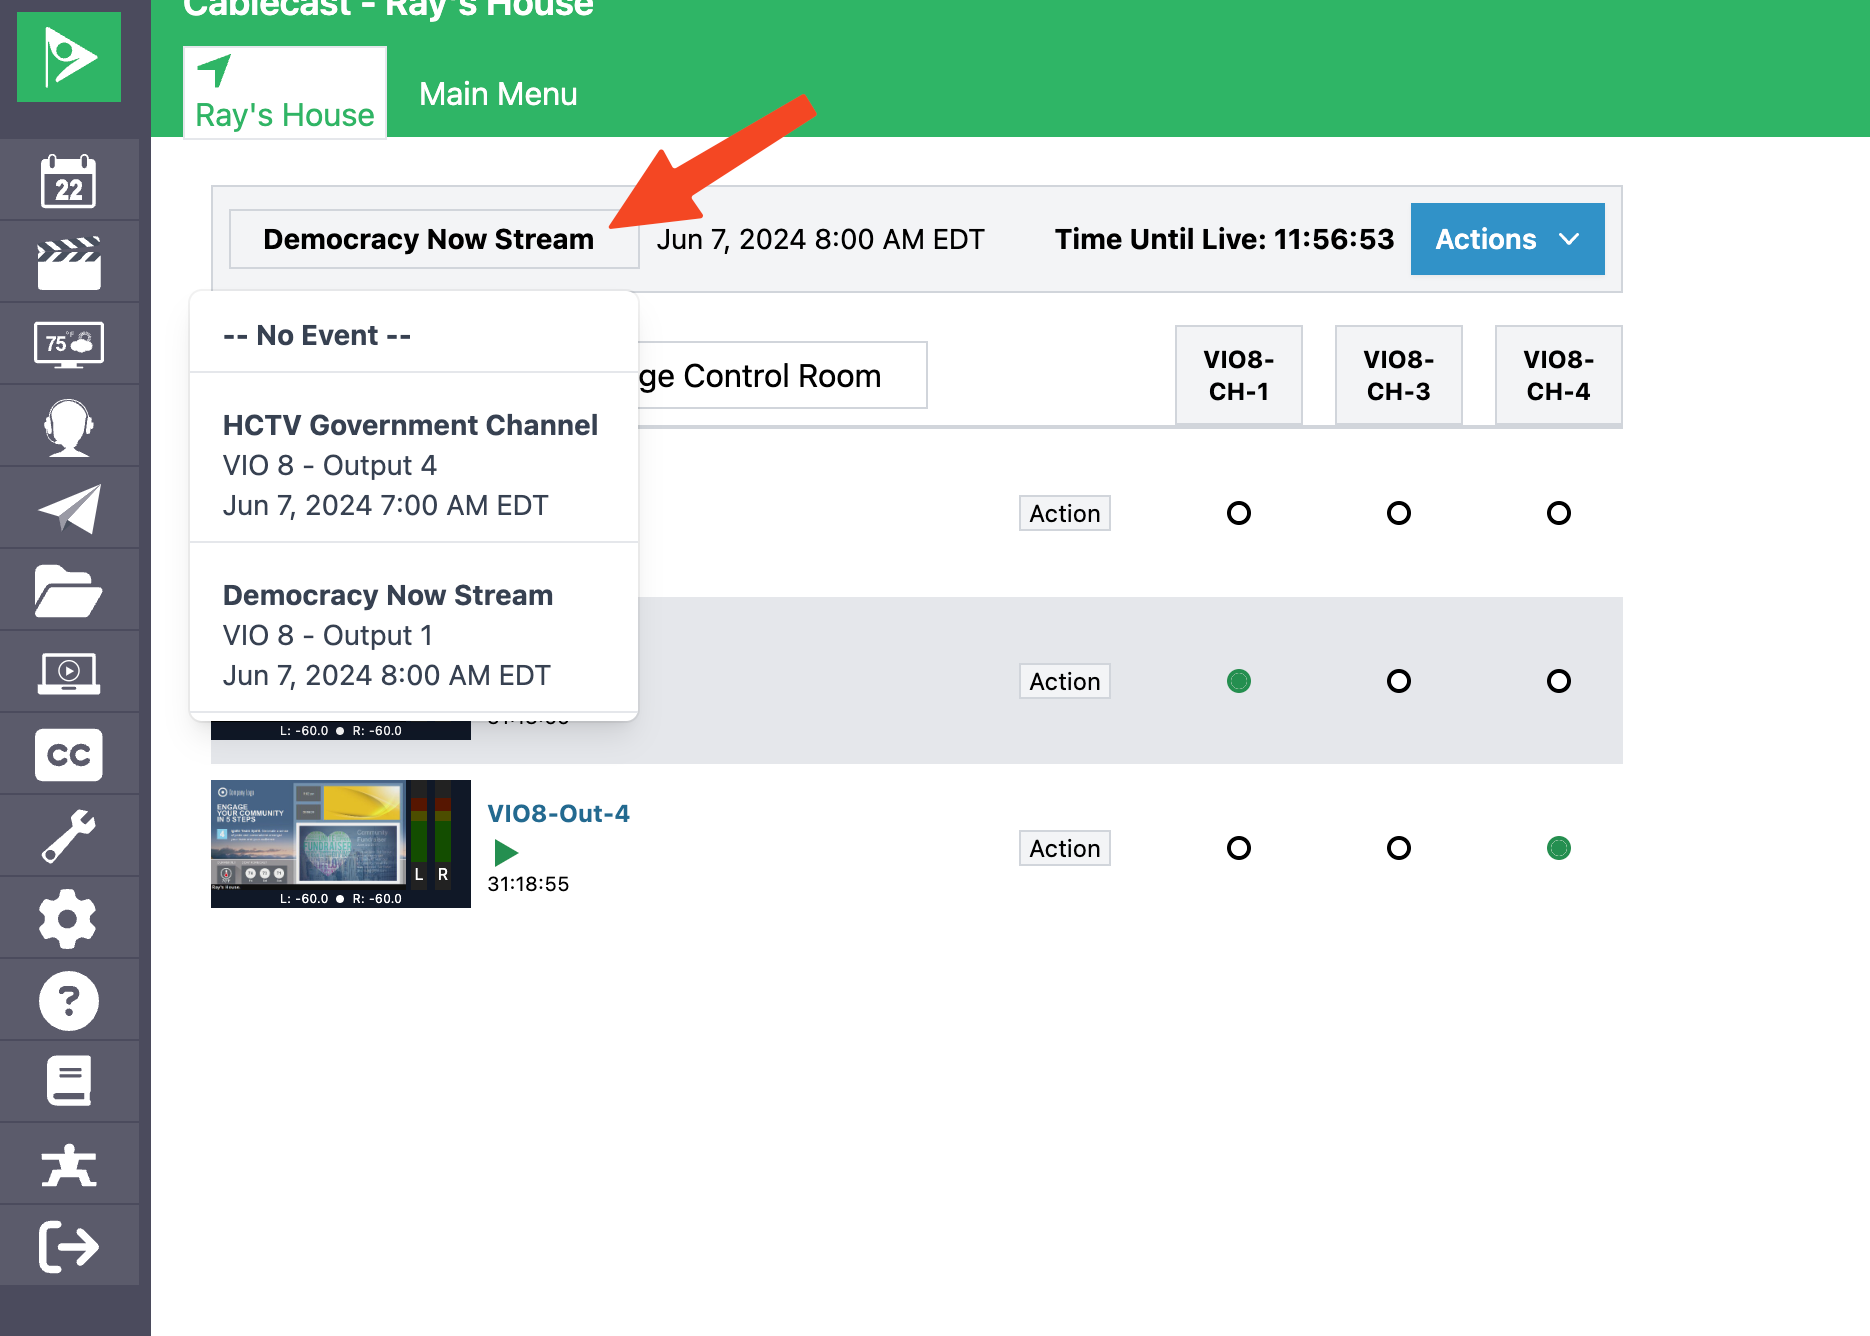
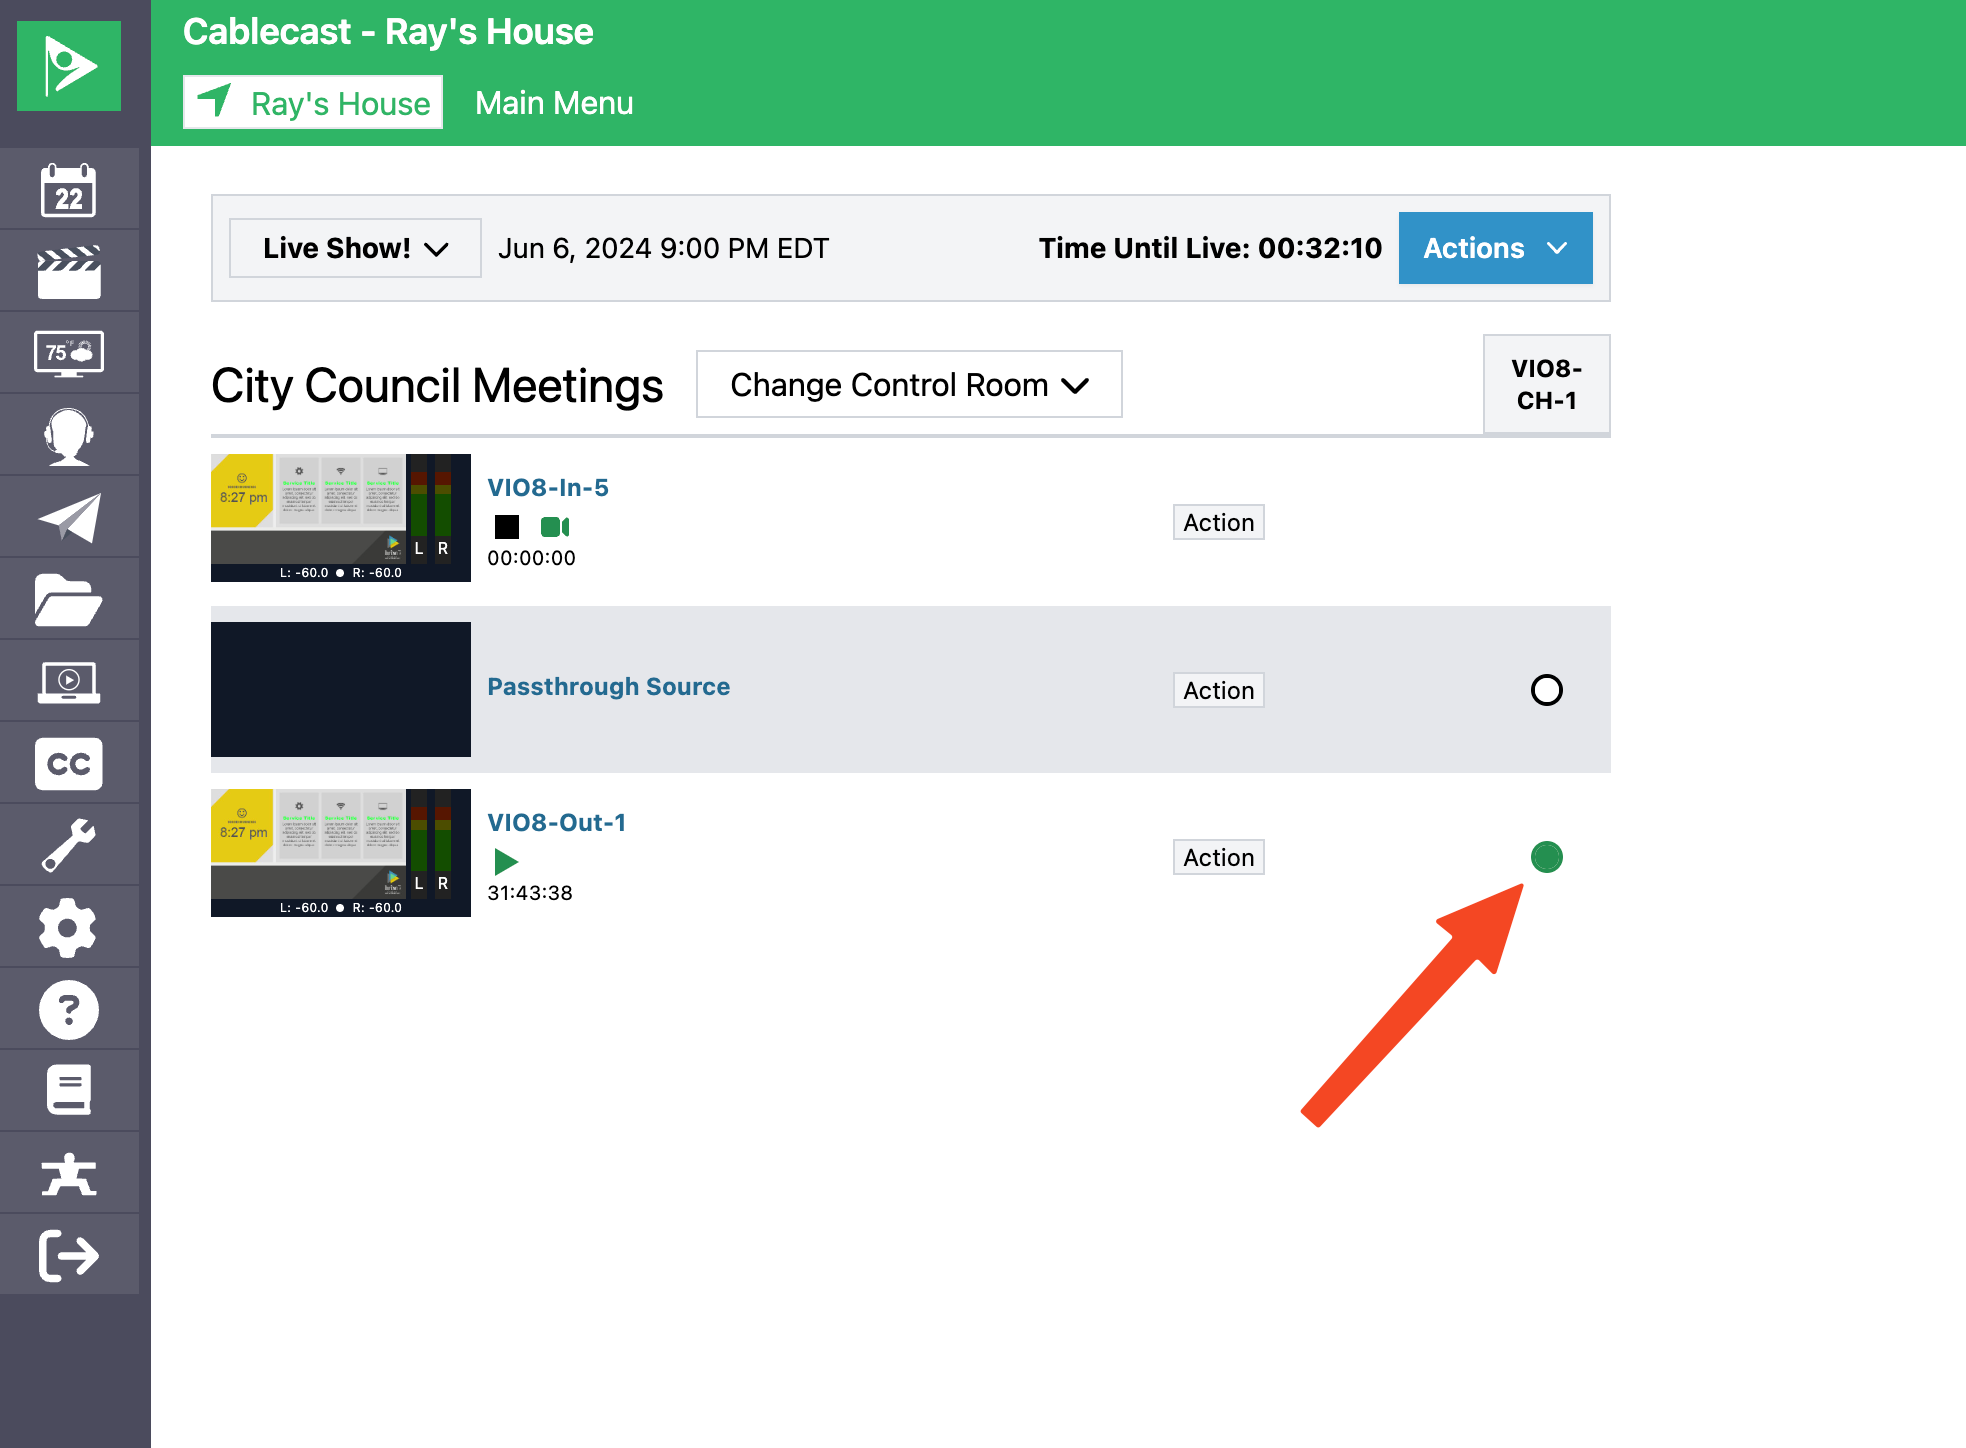
Event Bar: The Event Bar allows operators to select an upcoming live schedule run. Selecting an event automatically loads any devices and outputs used by that event into the Control Room, and displays the event's start time and a countdown clock. Macros can also reference the current event — for example, a Macro can set the Total Run Time (TRT) of the Show associated with the event.
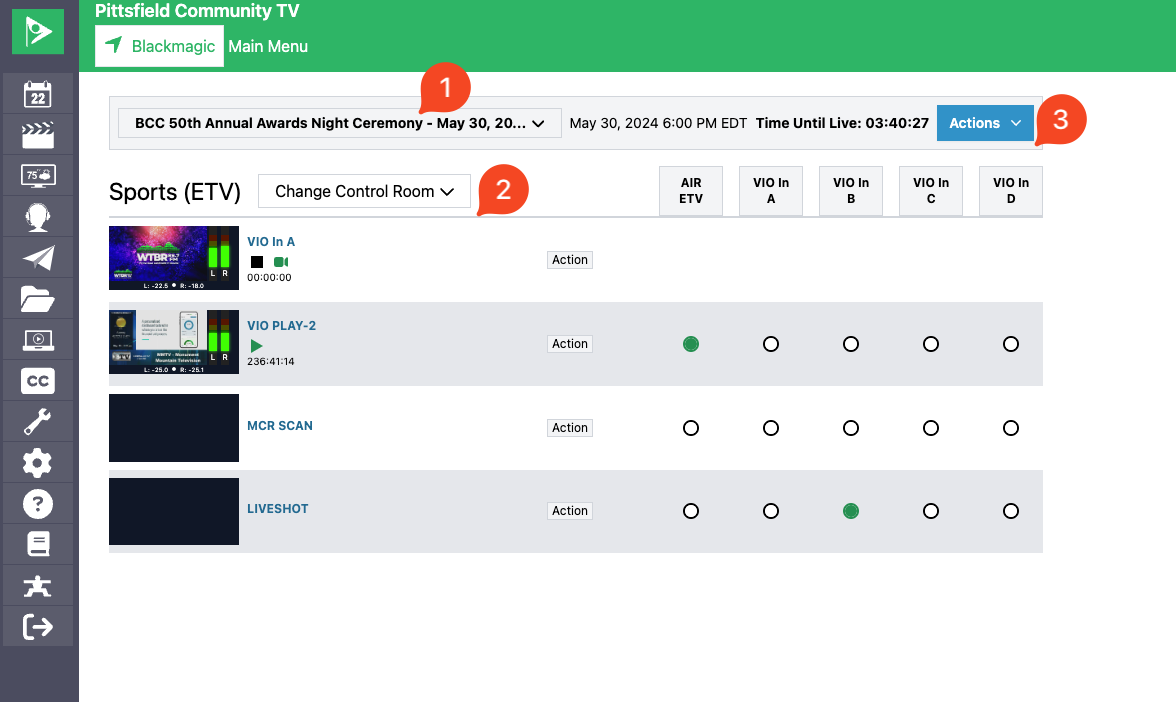
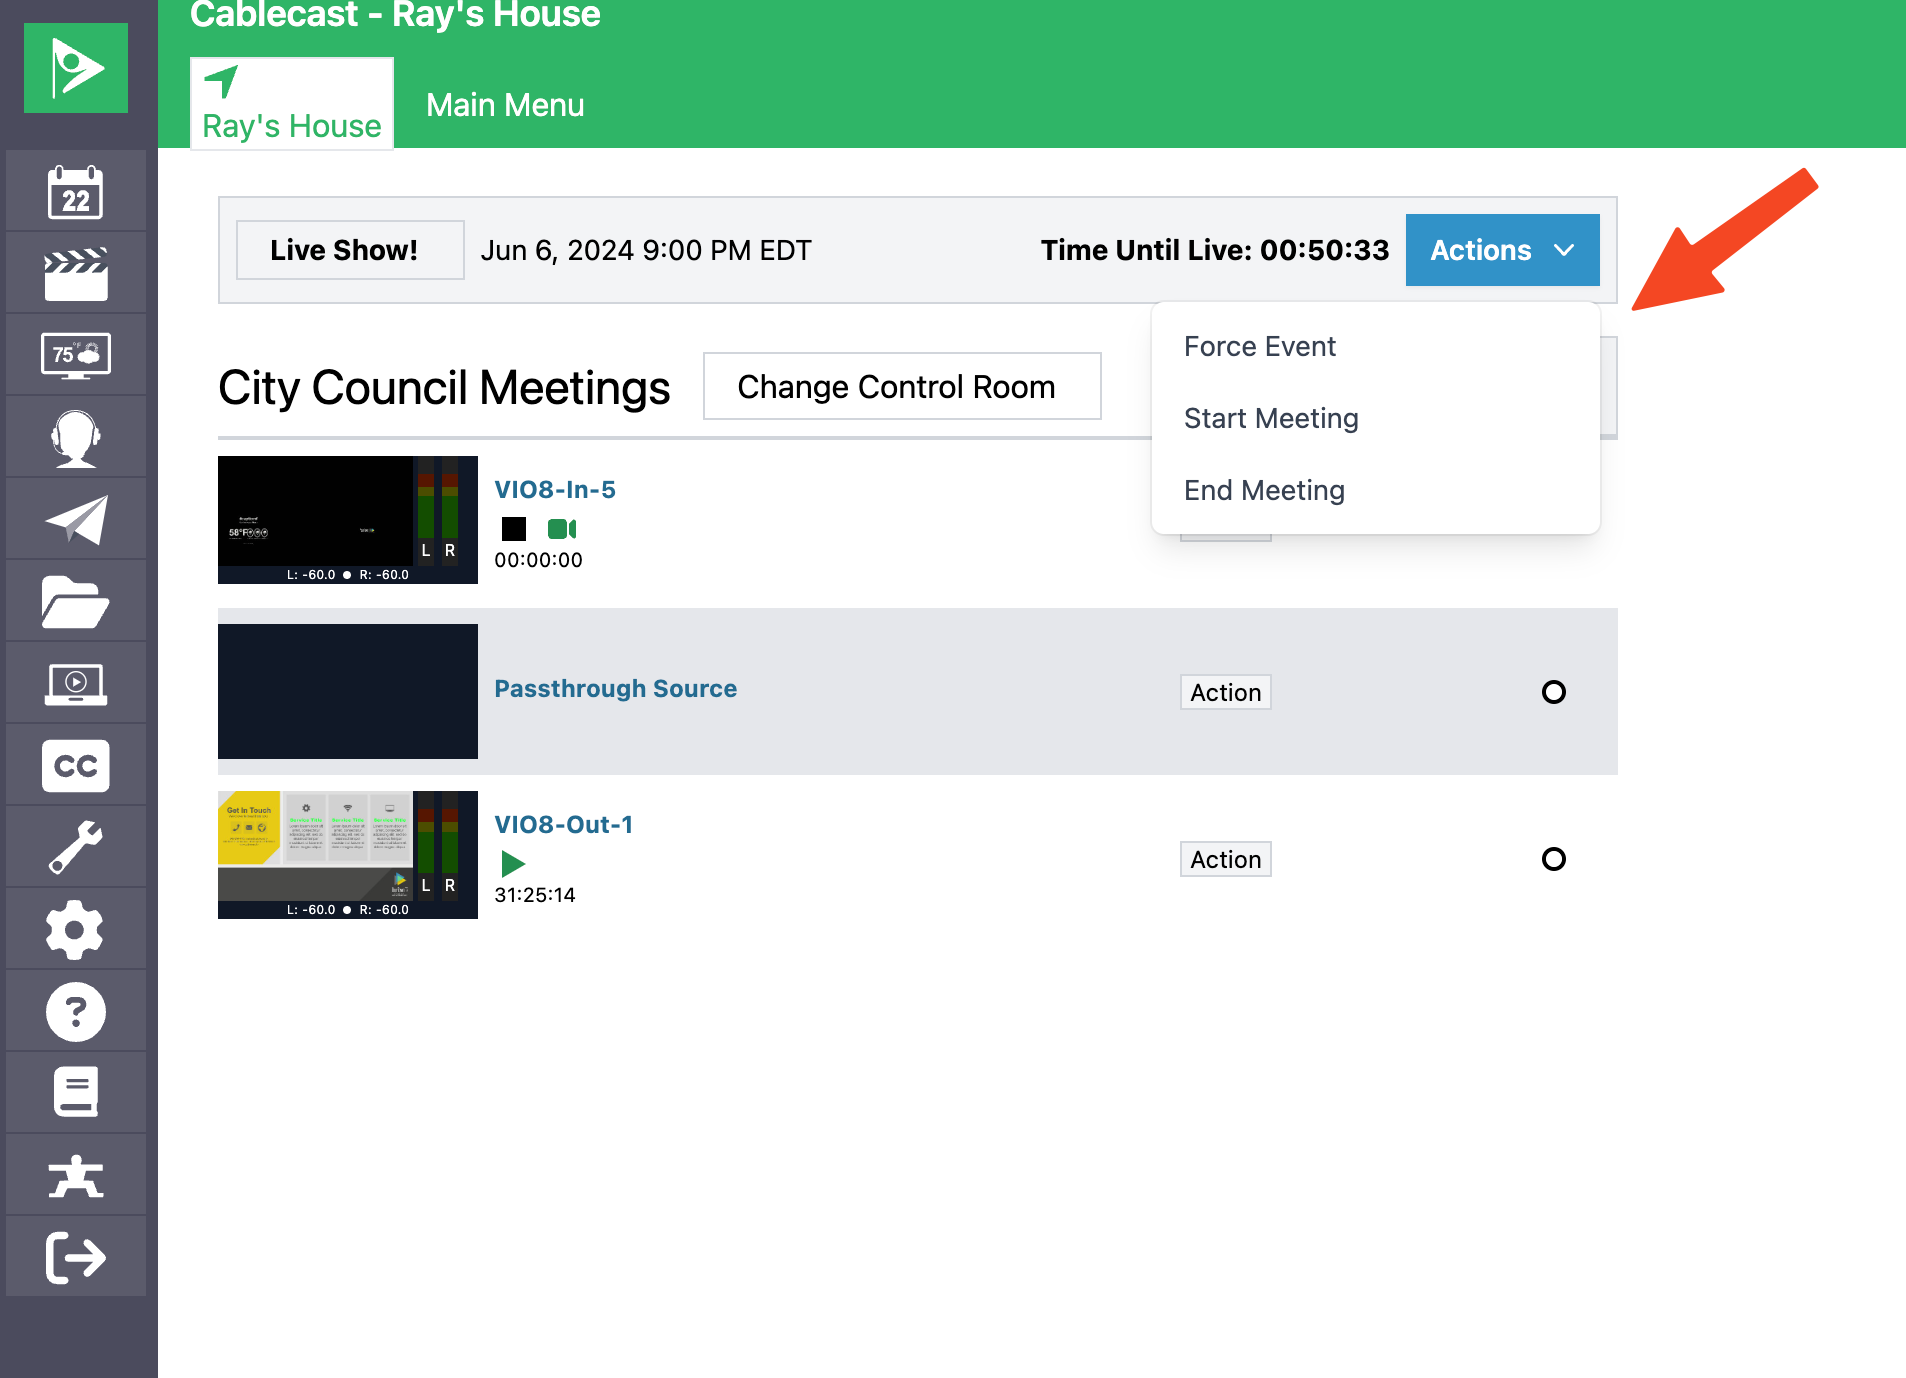
Actions Dropdown: The Actions Dropdown allows operators to force an event or fire a Macro. Forced events can start or stop a device, play Cablecast CG, play a stream, start captioning, or end a recording. Macros are an ordered series of actions that can do everything a forced event can do — and more. For example, a single Macro can start a live stream, switch the stream to air, start a recording, start closed captioning, and send a network stream to social media all in one click.
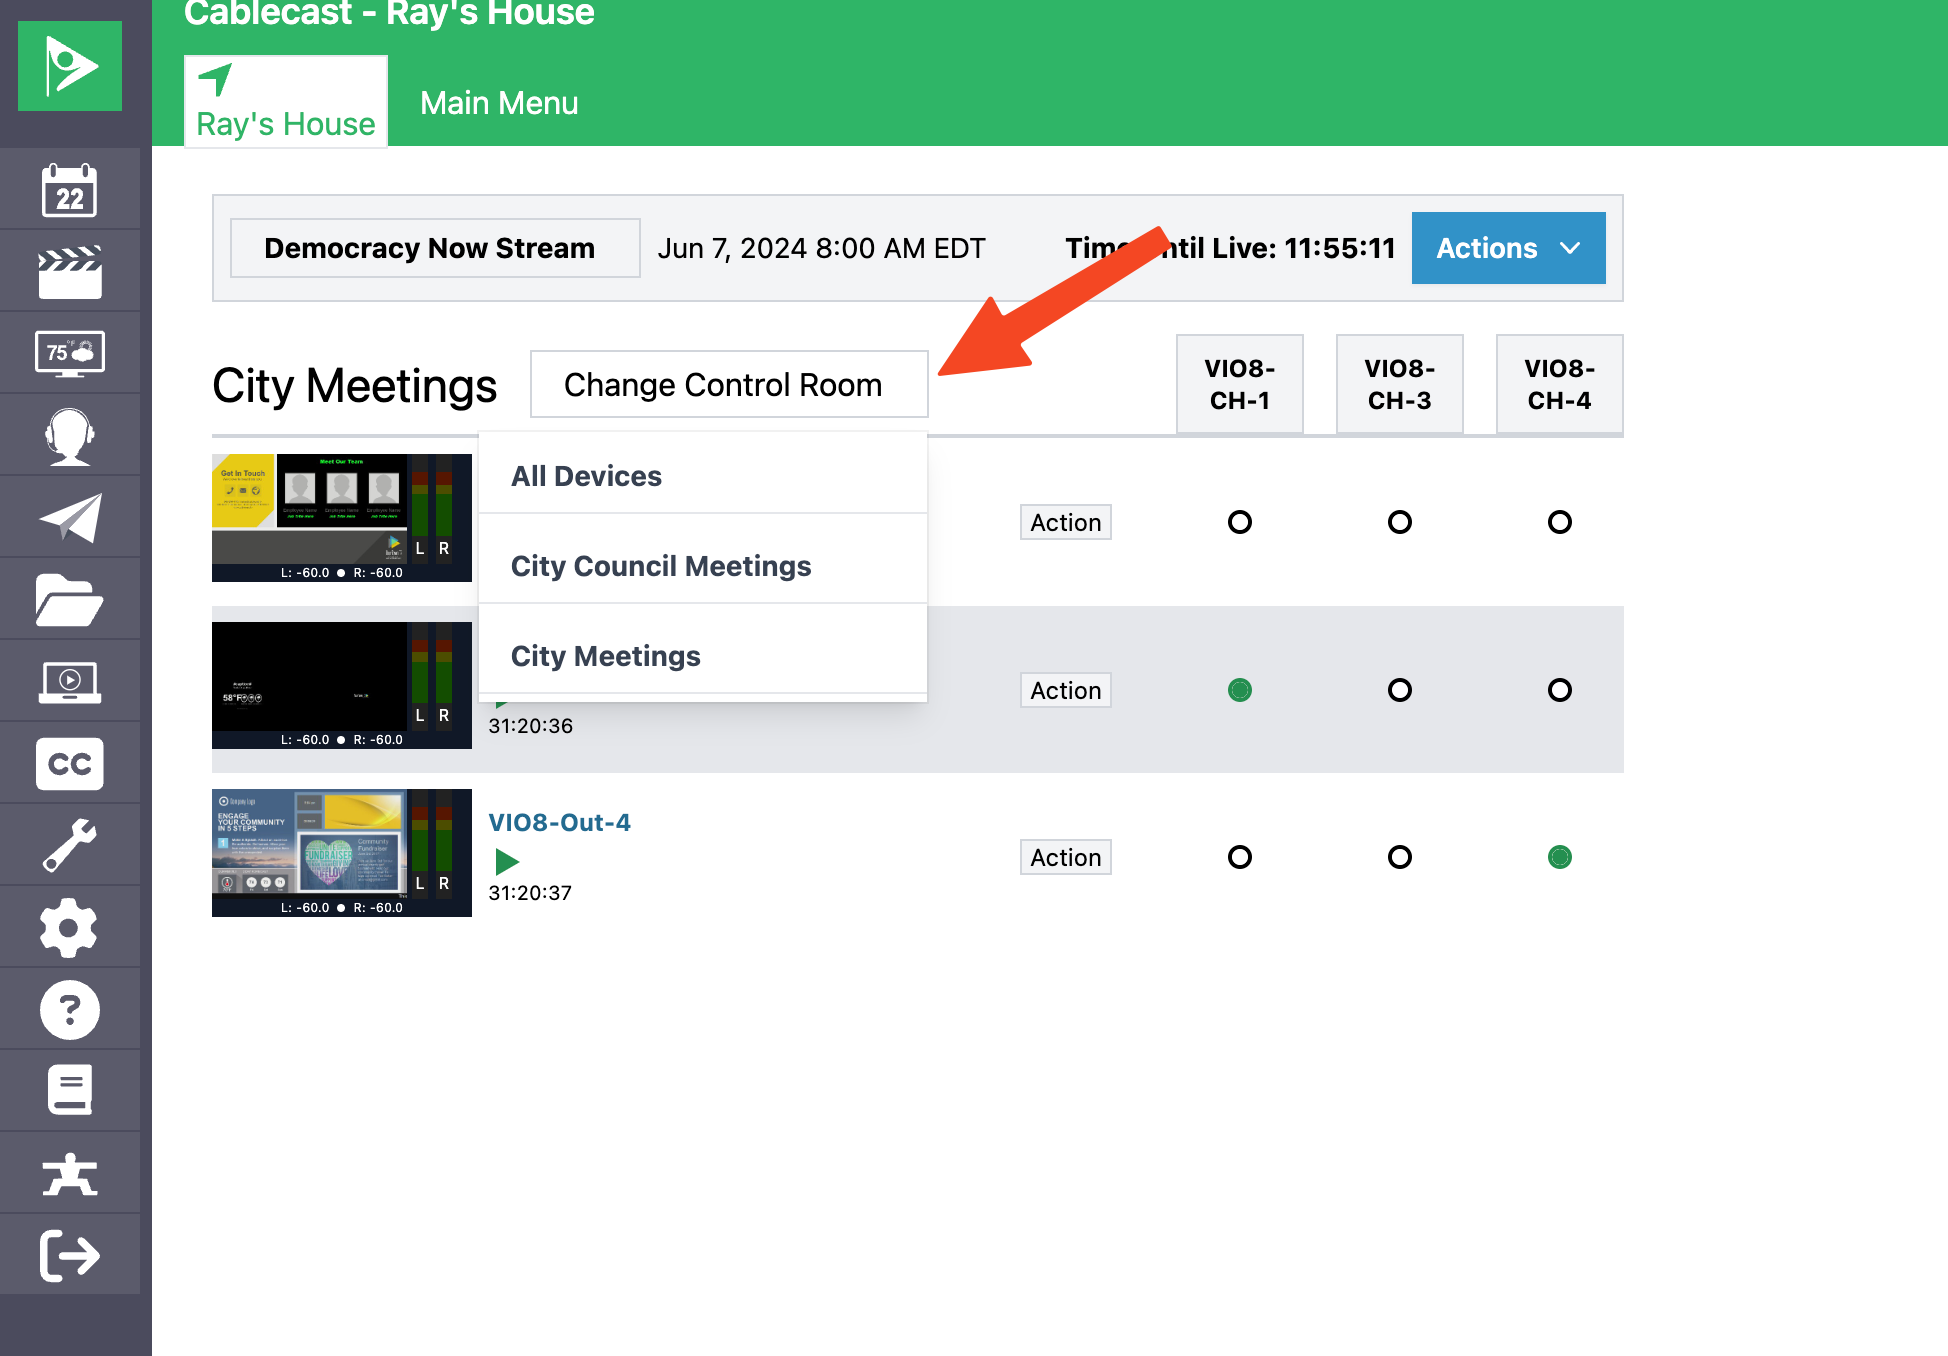
Control Room Selector: The Control Room Selector allows operators to switch between Control Rooms. You can create as many Control Rooms as your organization needs — purpose-built for different event types like school board meetings, city council sessions, or live sporting events.
Building Control Rooms
Control Rooms are infinitely customizable and designed to support a wide variety of live event workflows.
To build a Control Room, go to Settings → Location Settings → Autopilot → Control Rooms.
From here you can edit an existing Control Room, or click Add New Control Room to create a new one.

Give the Control Room a Name.
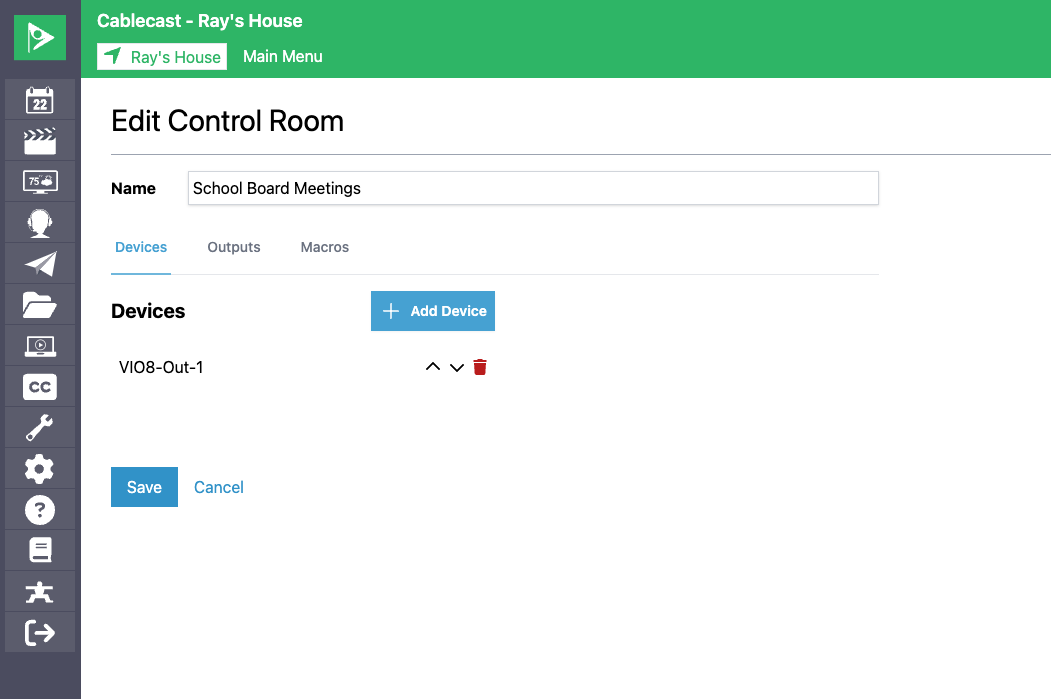
In the Devices tab, add the devices (router inputs) the Control Room should have access to — for example, a VIO server or a live feed.
In the Outputs tab, add the outputs (router outputs) the Control Room should have access to — for example, a channel output or encoder output.
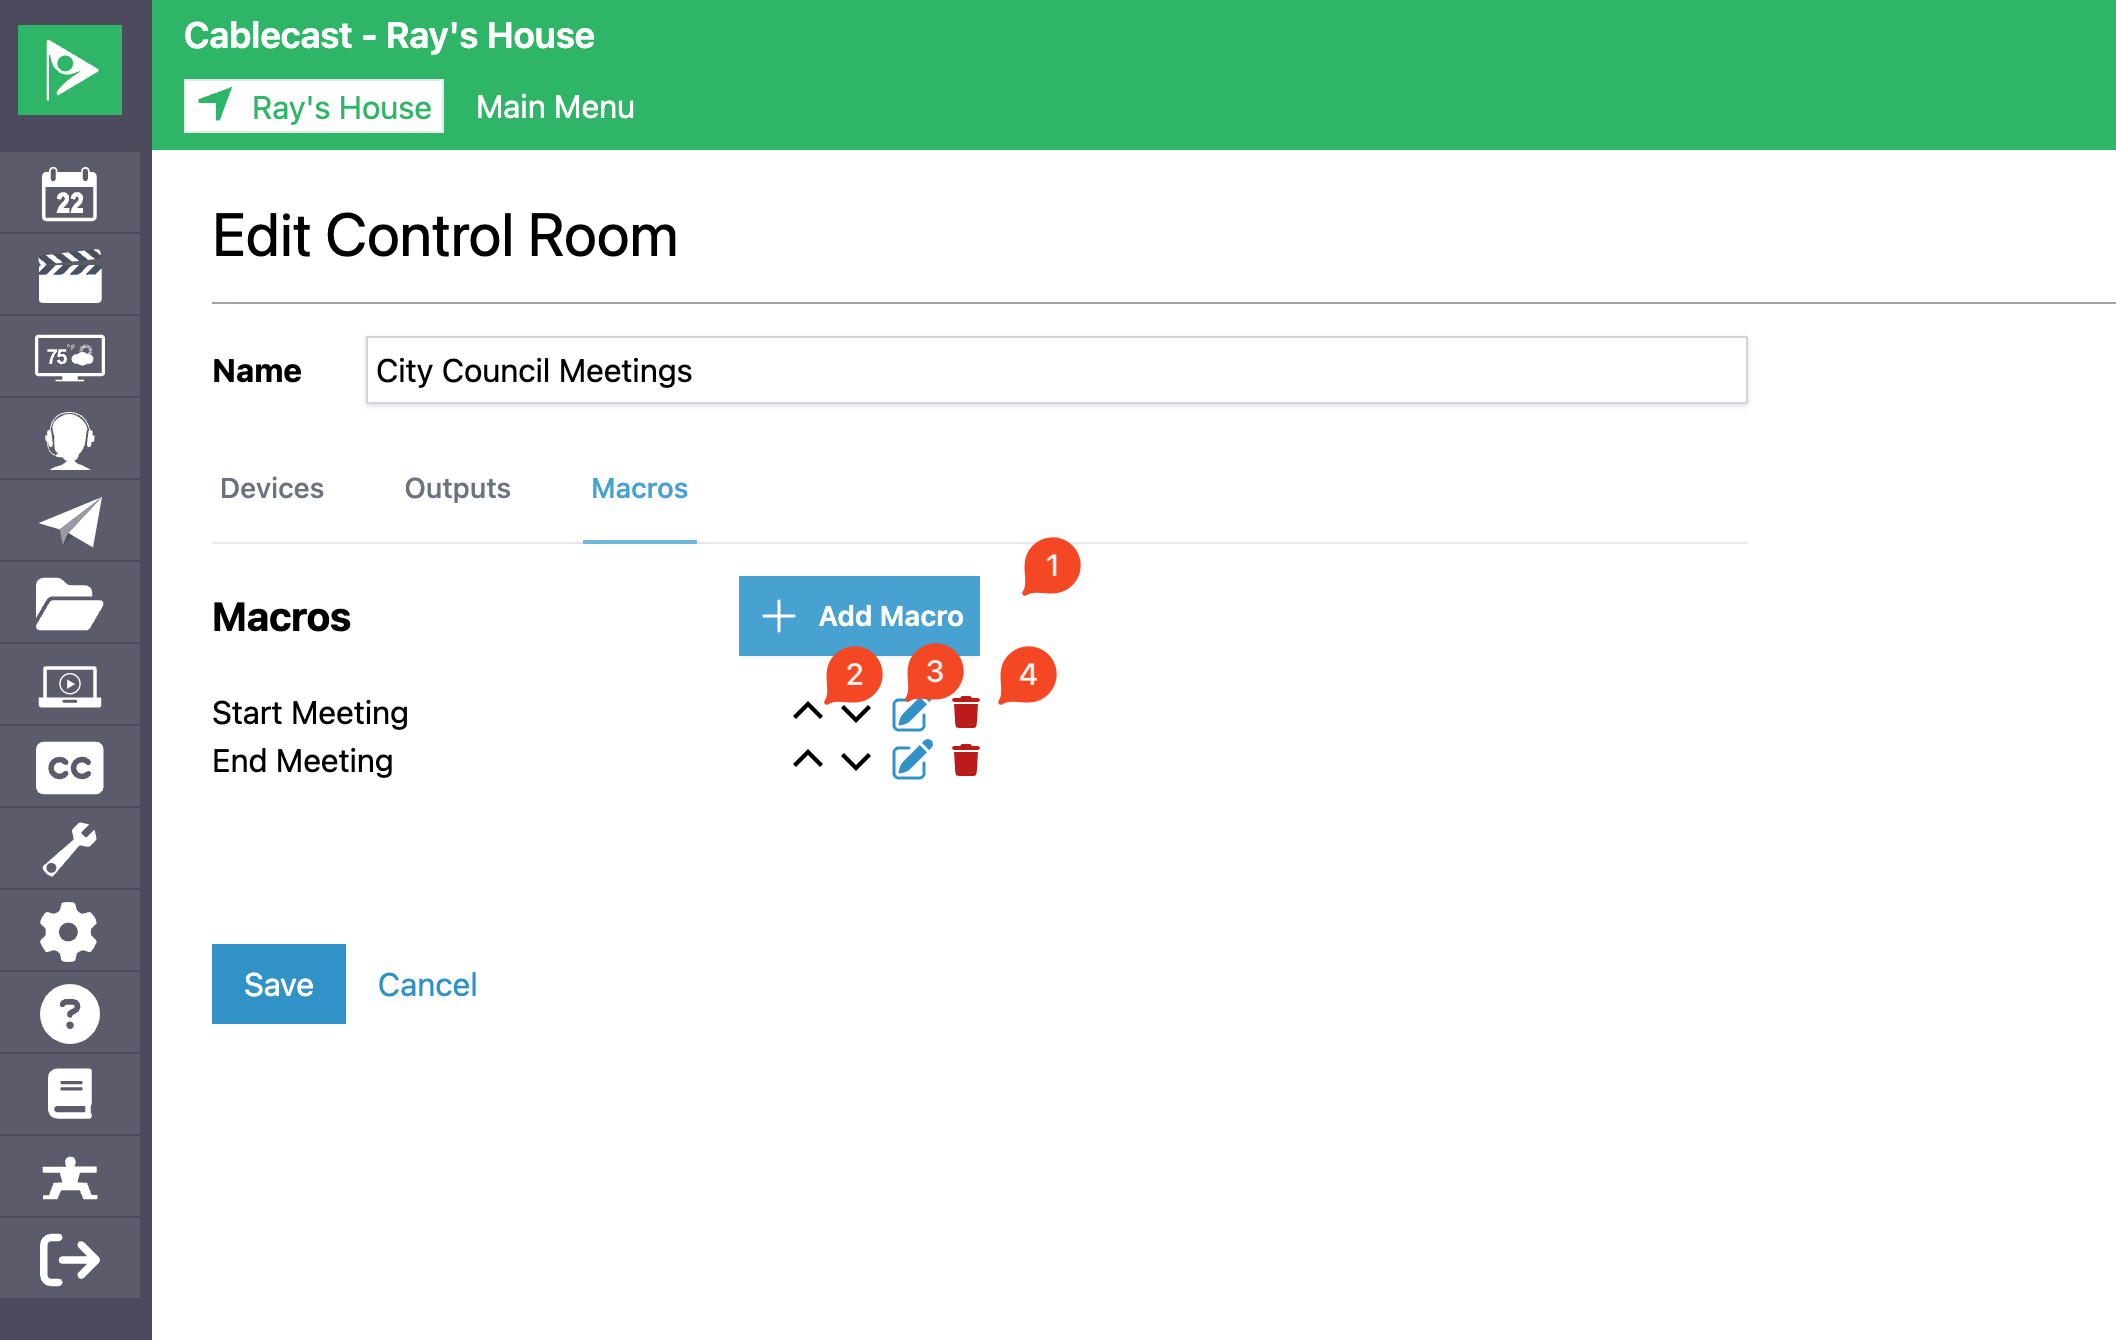
In the Macros tab, build the Macros for this Control Room, such as a "Start Meeting" or "End Meeting" Macro. Building Macros is covered in detail below.
How Do Control Rooms Load Devices and Outputs?
Control Rooms load devices and outputs in two ways:
Any device or output explicitly added to a Control Room's Devices or Outputs tabs is always available in that Control Room.
When a scheduled run is selected in the Event Bar, the Control Room automatically loads all devices and outputs that Autopilot used for that event.
Because of this automatic loading, you don't need to configure every possible device or output for a Control Room. Focus on devices and outputs that an operator might need manually — ones that aren't already automated by Cablecast.
When to Add Devices or Outputs Explicitly
Control Rooms Automatically Load Devices and Outputs From Scheduled Events
When building Control Rooms it's important to remember a Control Room will automatically load Devices and Outputs from the selected event in the Event Bar. This means for common scenarios you should only add new Devices and Outputs if they aren't controlled by Cablecast for an event.
The device or output isn't automated by Cablecast. For example, during a live sporting event you might need to switch to a different camera source at halftime. Because Cablecast can't predict when halftime will occur, it doesn't automate that switch. To make sure that source is available in the Control Room, add it explicitly in the Devices tab when configuring the Control Room.
You don't need to add the video server output, encoder, or channel output manually — those are all automated by Cablecast and load automatically when an event is selected in the Event Bar.
You need to control events across multiple channels. Events loaded from the Event Bar are scoped to the Cablecast channel the run was scheduled on. For example, if your station schedules a city parade to air on both the Government Channel and the Educational Channel, the Event Bar can only load devices for one channel at a time. If your Macros need to control both channels, build a Control Room that explicitly defines all required devices and outputs instead.
Building Macros
The Macros tab lets you manage all Macros for a Control Room.
Control | Description |
|---|---|
+ Add Macro | Adds a new Macro to the Control Room. |
Ordering buttons | The up and down arrows reorder Macros. This controls the order they appear in the Actions dropdown and the Hotkey shortcut menu. |
Edit (pencil icon) | Opens the step editor for the selected Macro. |
Delete (trash icon) | Removes the Macro from the Control Room. |
How to Create a control Room Macro
Creating a control Room
Editing the Steps of a Macro
Click the pencil icon next to a Macro to open the step editor. Steps run in order when the Macro is triggered.
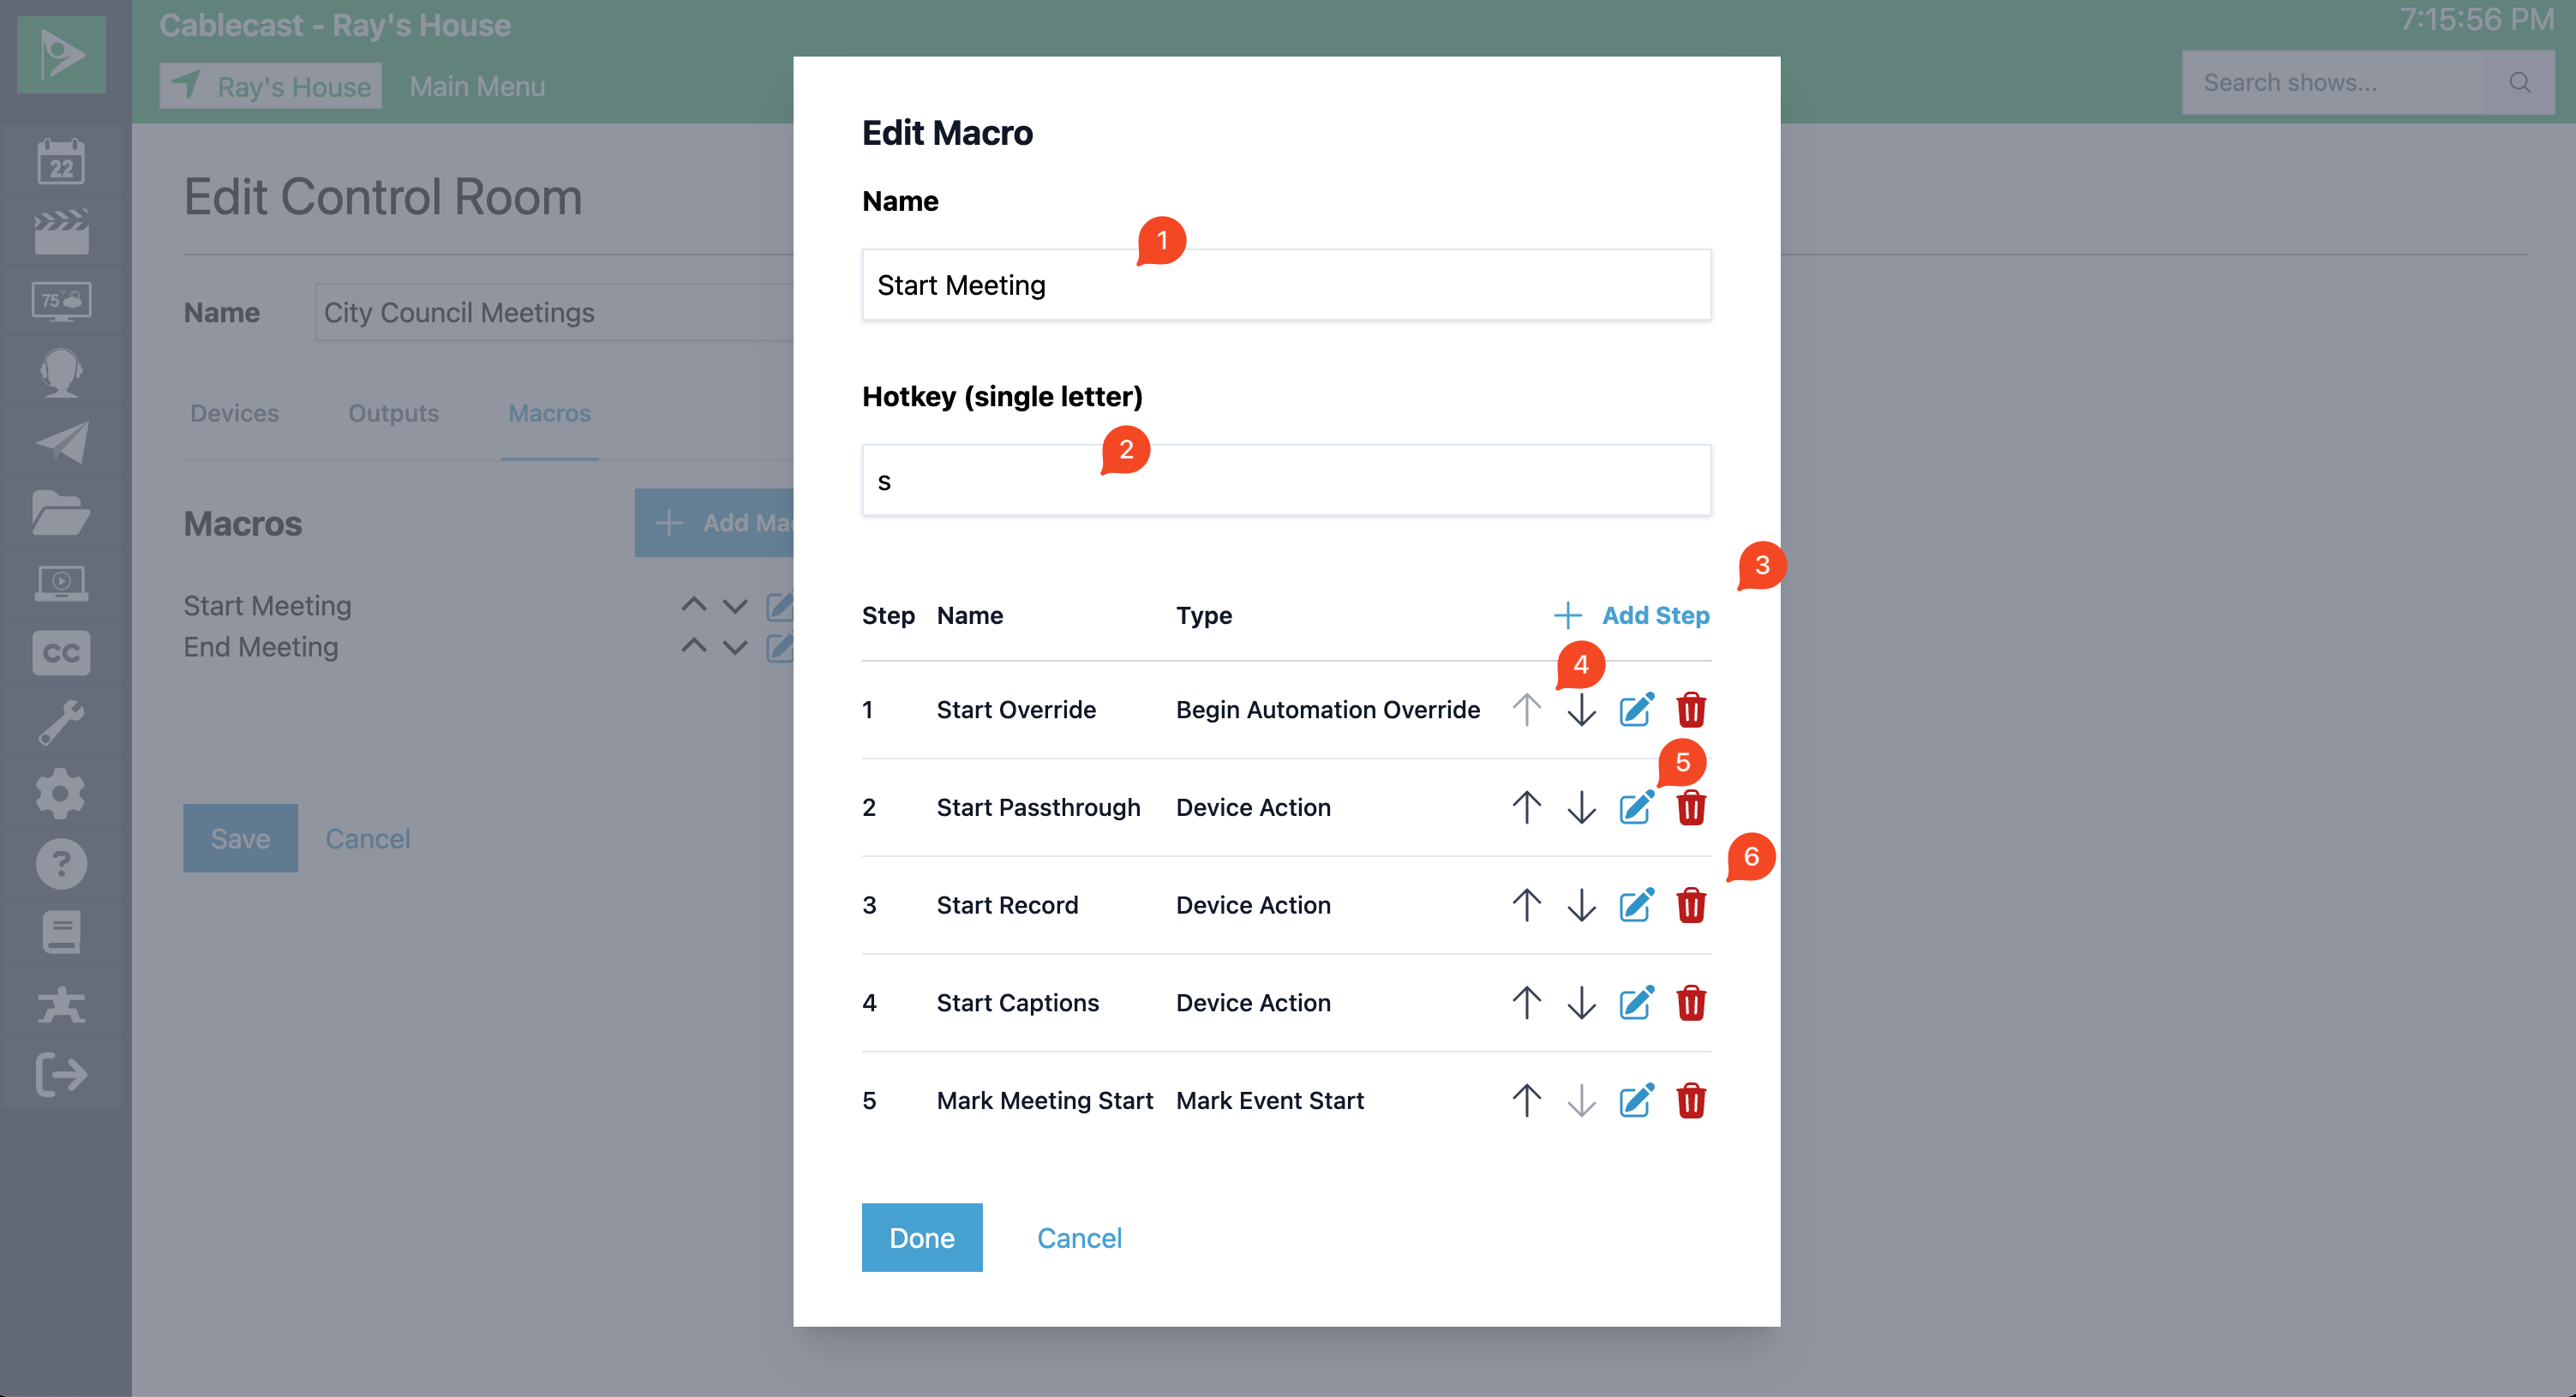
Each Macro has the following properties:
Field | Description |
|---|---|
Name | The name of the Macro. |
Hotkey | A single letter used as a keyboard shortcut to trigger the Macro in the Control Room. |
Within the step editor, use the following controls to build and manage steps:
Control | Description |
|---|---|
+ Add Step | Adds a new step to the Macro. |
Order arrows | Reorders steps. Step order matters — some actions depend on others completing first. |
Edit | Opens the configuration panel for that step. |
Delete (trash icon) | Removes the step from the Macro. |
Editing a Step
All Macro steps share these basic properties:
Field | Description |
|---|---|
Name | The name of the step. |
Type | The type of action the step performs. |
Depending on the step type, additional configuration options appear. For example, a Device Action step will show fields for Device Source, Device, and Action.

Device Source and Automation Override Source
Some Macro steps need to know which device or output to act on. For steps tied to a fixed setup, you can specify a particular device directly. But for Control Rooms that load devices dynamically based on the selected event, the specific device won't be known until the event is loaded — so the step needs a rule for how to choose its target at runtime.
Device Source controls how a Device Action step selects its device. The following options are available:
Option | Description |
|---|---|
Specific Device | The step always acts on a single, manually selected device. |
Event Playback Device | The step acts on the playback device assigned to the selected event. |
Event Encode Device | The step acts on the encode device assigned to the selected event. |
Automation Override Source controls how Begin Automation Override and End Automation Override steps select which devices and outputs to include in the override. The following options are available:
Option | Description |
|---|---|
Specific Output | The override applies to a single, manually selected output. |
Event | The override applies to all devices and outputs associated with the selected event. |
All Outputs and Devices | The override applies to every output and device in the Control Room. |
Complete List of Step Actions
The following step types are available when building Macros. Steps marked with * only work when an event is selected in the Event Bar.
Step Action | Description |
|---|---|
Begin Automation Override | Overrides outputs and devices so that scheduled automation is paused. Use this at the start of a live event to prevent automation from interfering if the event runs long. |
End Automation Override | Ends the automation override and returns outputs and devices to regular automation. |
Device Action | Performs an action on a device — anything that can be done manually in the Control Room using Force Event. |
Enable VOD * | Enables Video on Demand (VOD) for the event's Show. |
Mark Event Start * | Records the timestamp when the event actually starts. Used by Set Total Run Time to calculate the event's duration. |
Mark Event End * | Records the timestamp when the event actually ends. Used by Set Total Run Time to calculate the event's duration. |
Queue Autopilot Send | Queues an Autopilot Send using default settings. |
Set Total Run Time * | Sets the length of the longest Reel in the event's Show, based on the timestamps recorded by Mark Event Start and Mark Event End. |
Switch | Forces a video routing switcher take from a device (router input) to an output (router output). |
Wait | Pauses execution for a specified number of seconds. Useful when a delay between steps is needed. |
Putting Macros All Together
Combining the step types above can yield powerful results. Below are two sample Macros showing how a complete meeting workflow can be automated.
Note: These are examples, not required configurations. Your Macros may vary depending on your station's setup.
Starting a Meeting
Step | Action | Purpose |
|---|---|---|
1 | Begin Automation Override | Prevents scheduled automation from interfering if the event runs long. |
2 | Device Action | Starts recording on the event's encode device. |
3 | Device Action | Starts live captioning. |
4 | Switch | Switches the event's playback device to the channel output. |
5 | Mark Event Start | Records the timestamp when the event actually started. |
Ending a Meeting
Step | Action | Purpose |
|---|---|---|
1 | Mark Event End | Records the timestamp when the event actually ended. |
2 | End Automation Override | Ends the override and returns outputs and devices to regular automation. |
3 | Set Format | Sets the format of the event's Show to a video server format for replays. |
4 | Set Total Run Time | Sets the length of the Show based on the marked start and end timestamps. |
5 | Device Action | Plays Cablecast CG to put the channel on the Bulletin Board. |
6 | Queue Autopilot Send | Queues an Autopilot Send to remove the original live event from the automation schedule and create replay events. |
With these two Macros, you can fully manage a live meeting with just two clicks.
Using Control Rooms
There are a few ways to access Control Rooms. The quickest is to click the gamepad icon in the left-hand menu. You can also navigate there through Autopilot in the left-hand menu, then click Control Rooms, though this requires a couple of extra clicks.
Control Rooms can also be accessed by clicking the gamepad icon in the Main Menu heads up display.

Switching Control Rooms
When you first open the Control Rooms screen, no Control Room is selected and the view defaults to All Devices. In this state, Macros are not available — only manual force events can be run.
To load a Control Room, click Change Control Room in the Event Bar and select the desired Control Room. To return to the default view, click All Devices.
Switching Events
When a Control Room loads, no event is selected by default. To load an event, click the Event Selector in the Event Bar and choose the desired event.
What Events Appear in the Event Bar?
The Event Bar does not show every run in your schedule. It shows only Shows scheduled as Live or Network Stream formats.
Forcing Events, Running Macros, and Forcing Routing Switches
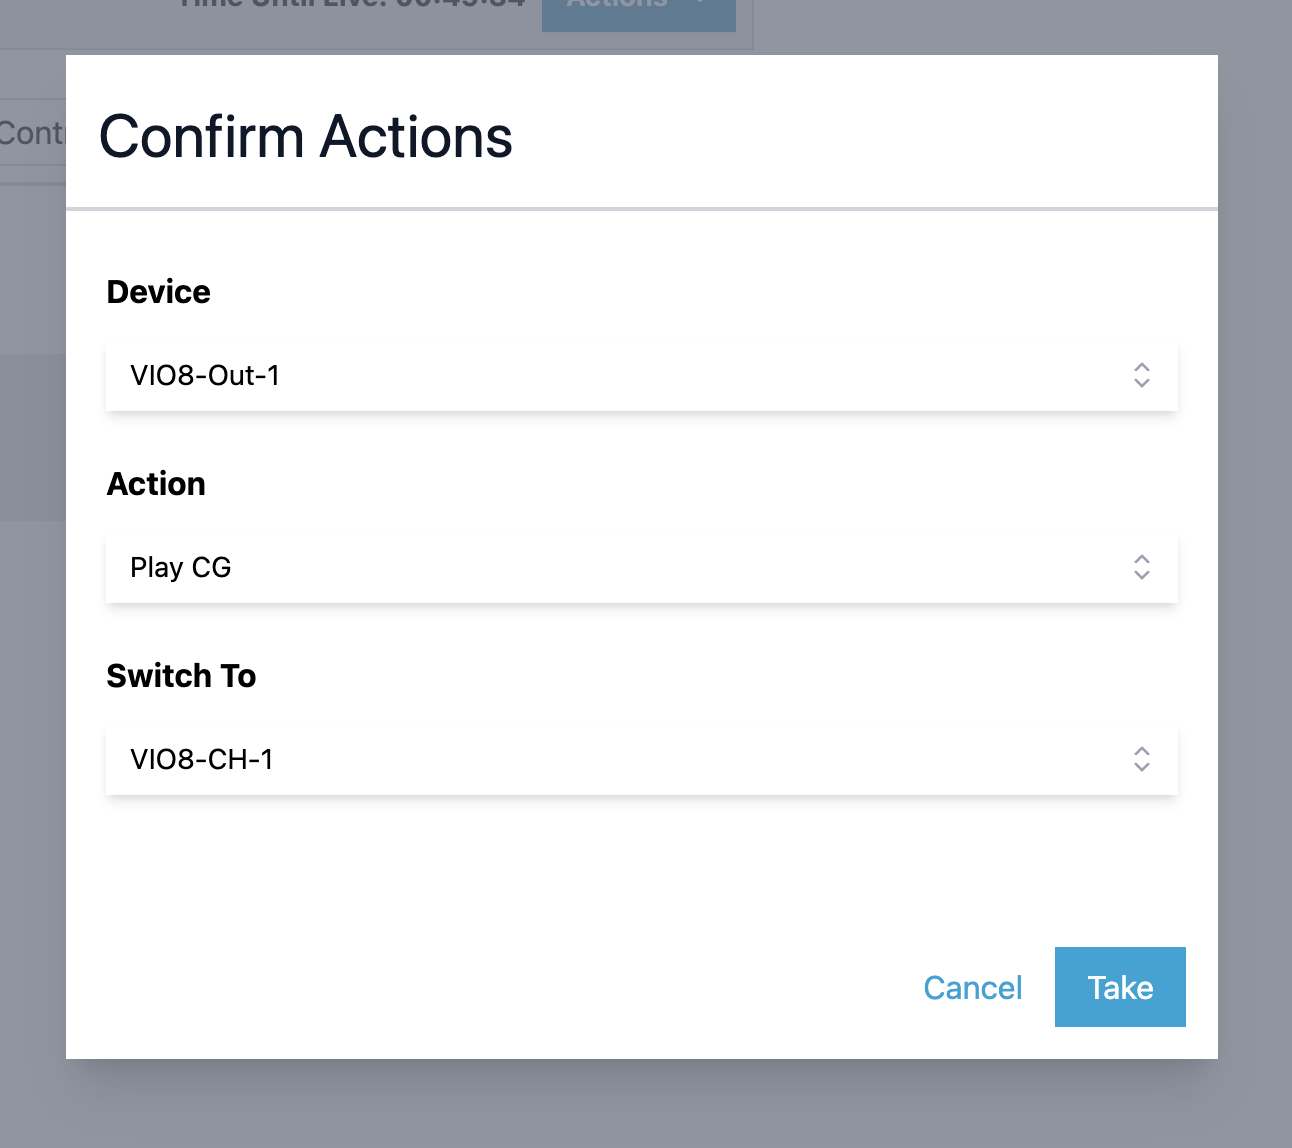
To force an event, click the Actions button in the Event Bar and choose Force Event. This opens the Confirm Actions screen, where you can choose a device to force the action on. Depending on the event type, additional properties may need to be configured.
You can also select an output to perform a Device Action and a routing switch at the same time.
To quickly switch from one device to another, click the patch (the connection point between a device input and output) for the desired device and output.
Keyboard Shortcuts for Macros
Control Rooms support keyboard shortcuts, so operators can trigger Macros without reaching for the mouse — useful for fast-moving live productions.
To bring up the keyboard shortcut overlay, press A for Actions. The overlay lists all Macros in the Control Room along with their assigned Hotkey. If a Macro doesn't have a custom Hotkey assigned, it can be triggered by its position in the list.
For example, pressing A then 1 would fire the first Macro in the list.
Restricting and Granting Access to Control Rooms
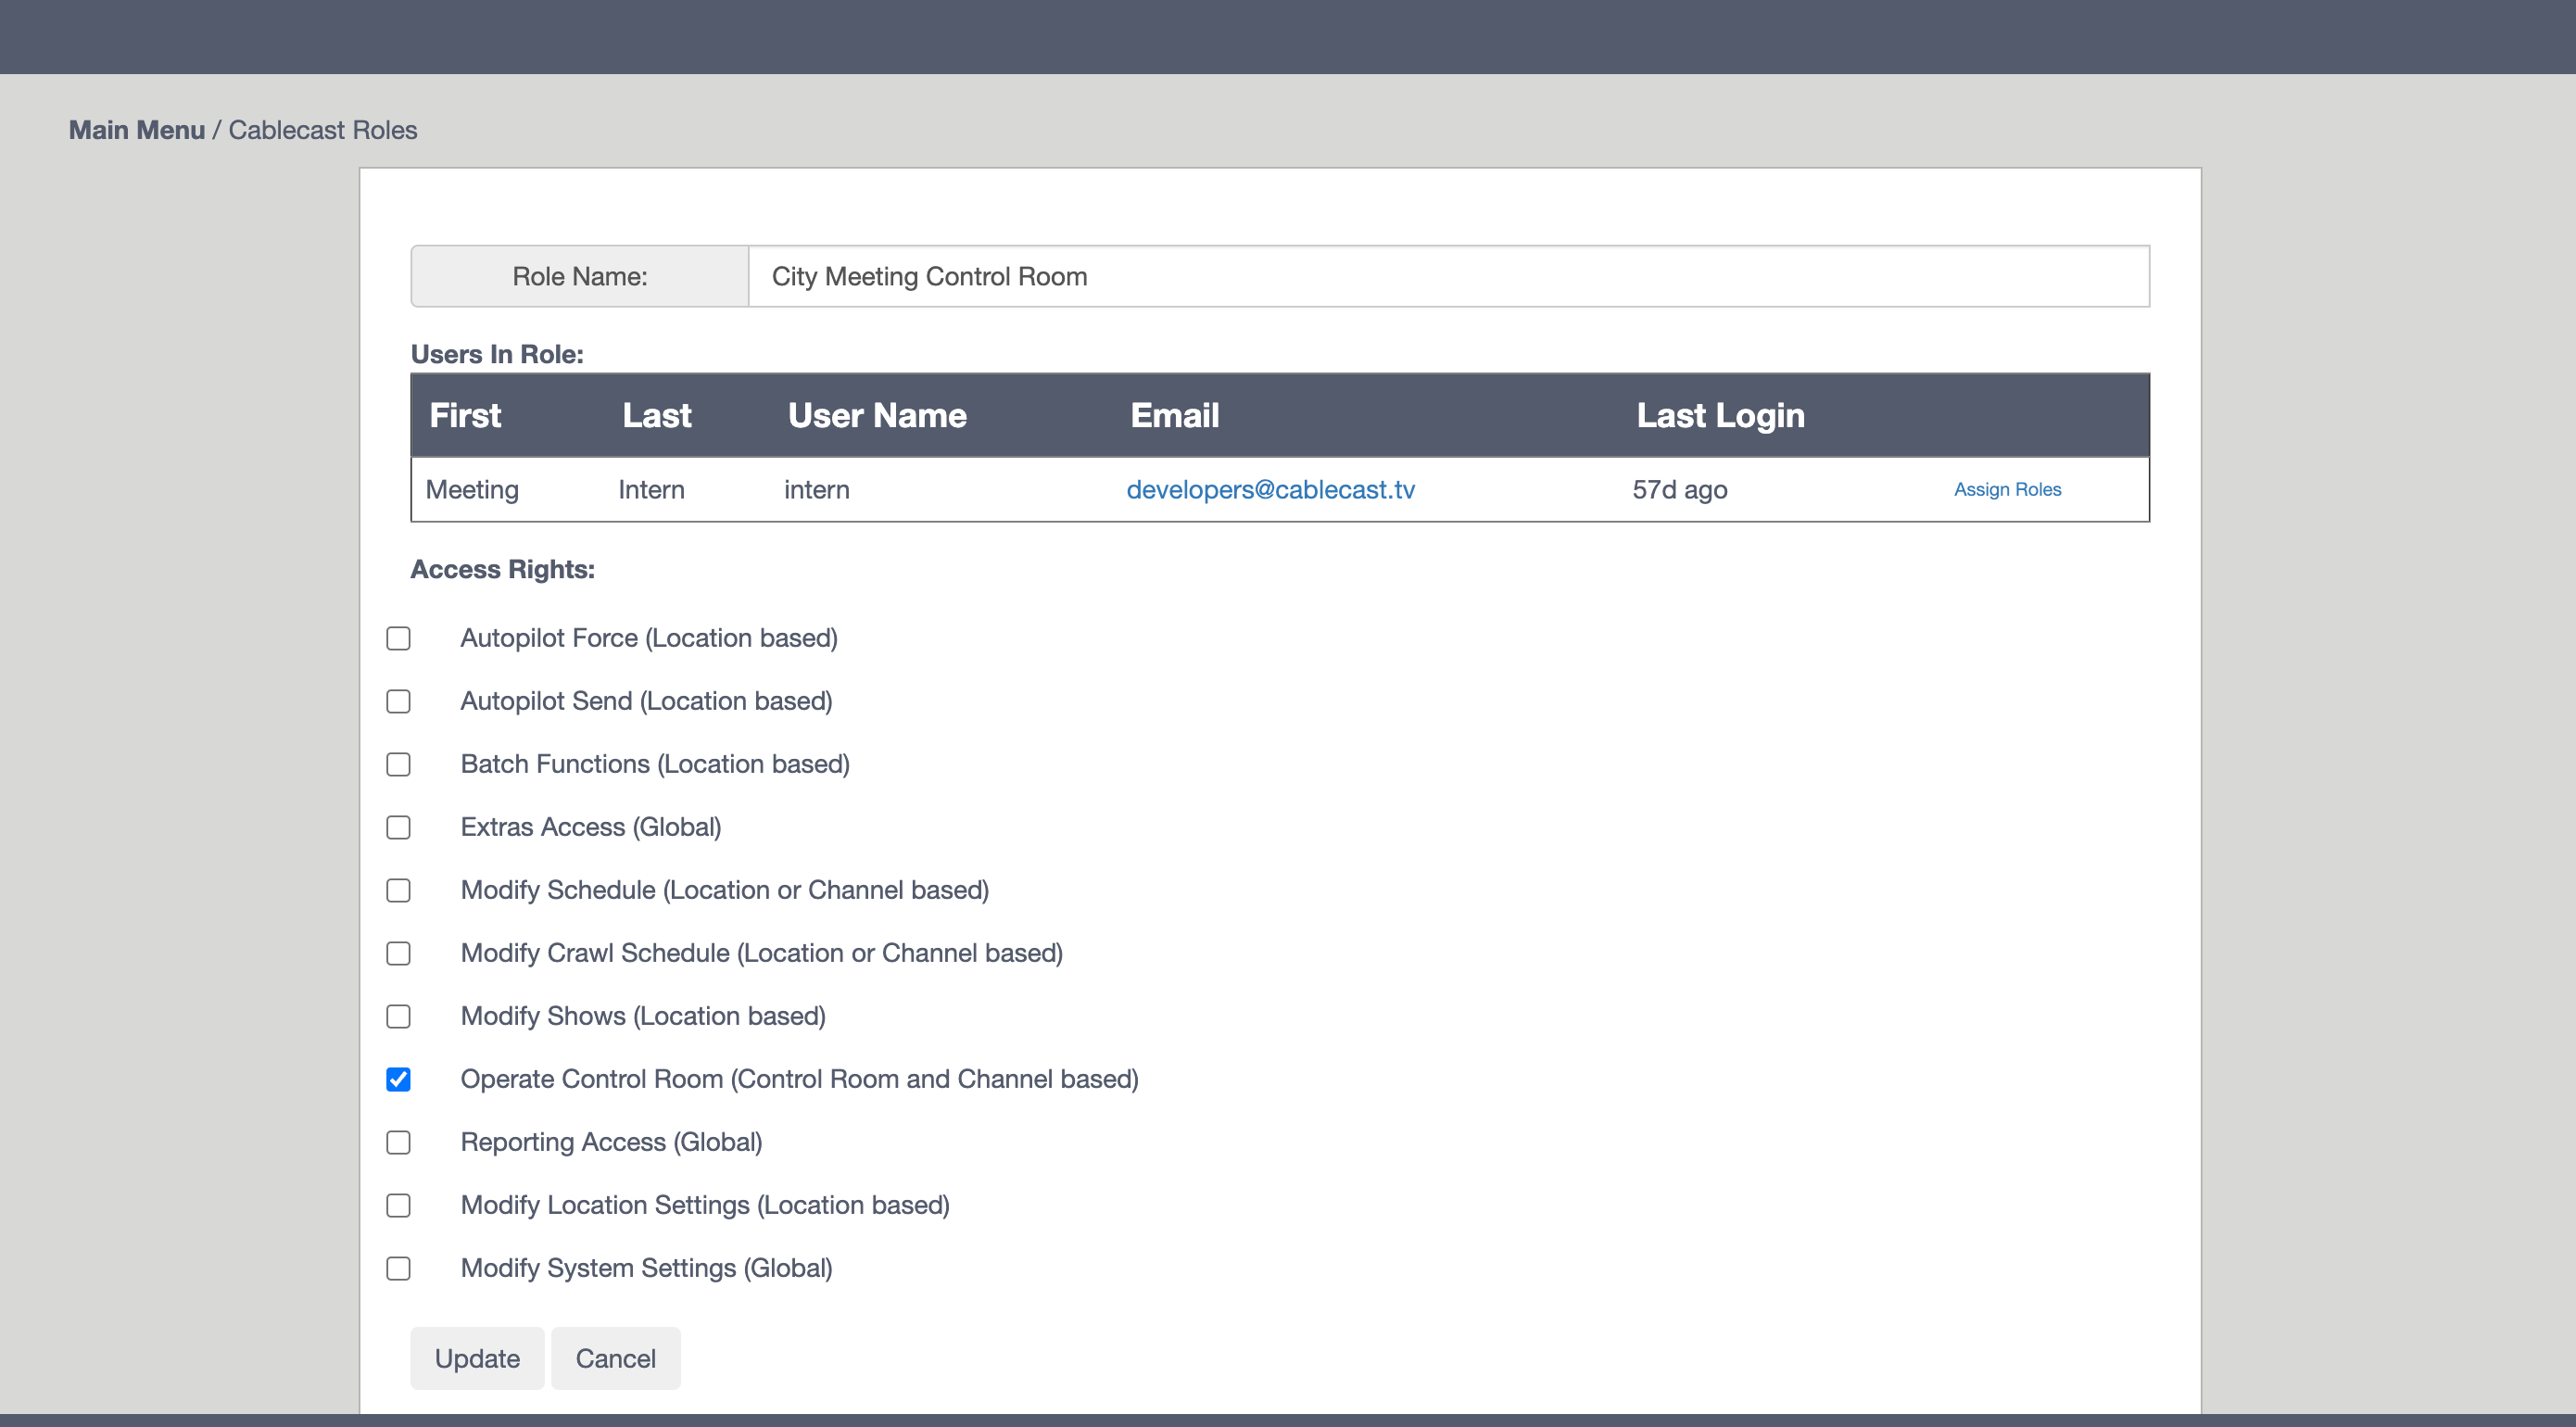
Access to Control Rooms can be restricted using Access Rights, allowing Cablecast Administrators to create User Roles scoped specifically to Control Room operation. Users whose roles are limited to Control Rooms cannot perform any other actions in Cablecast — making this a safe option for giving contractors or volunteers access to operate live events without broader system permissions.
To give users access to Control Rooms, their Role must include the Operate Control Room Access Right.
To edit Access Rights for a Role:
Go to User Management in the FrontDoor main menu.
Click Cablecast Roles to load a list of Cablecast-specific roles.
Click the name of the Role you want to modify.
Enable the Operate Control Room Access Right.
Access Scope: Domains
Roles are assigned to a User and Domain combination. A Domain defines the scope at which the Role applies. The three supported Domains for Control Rooms are:
Domain | What it allows |
|---|---|
Location | The user can load and operate any Control Room at that location. |
Channel | The user can load any events scheduled on that channel. |
Control Room | The user can load and operate only the specified Control Room. |
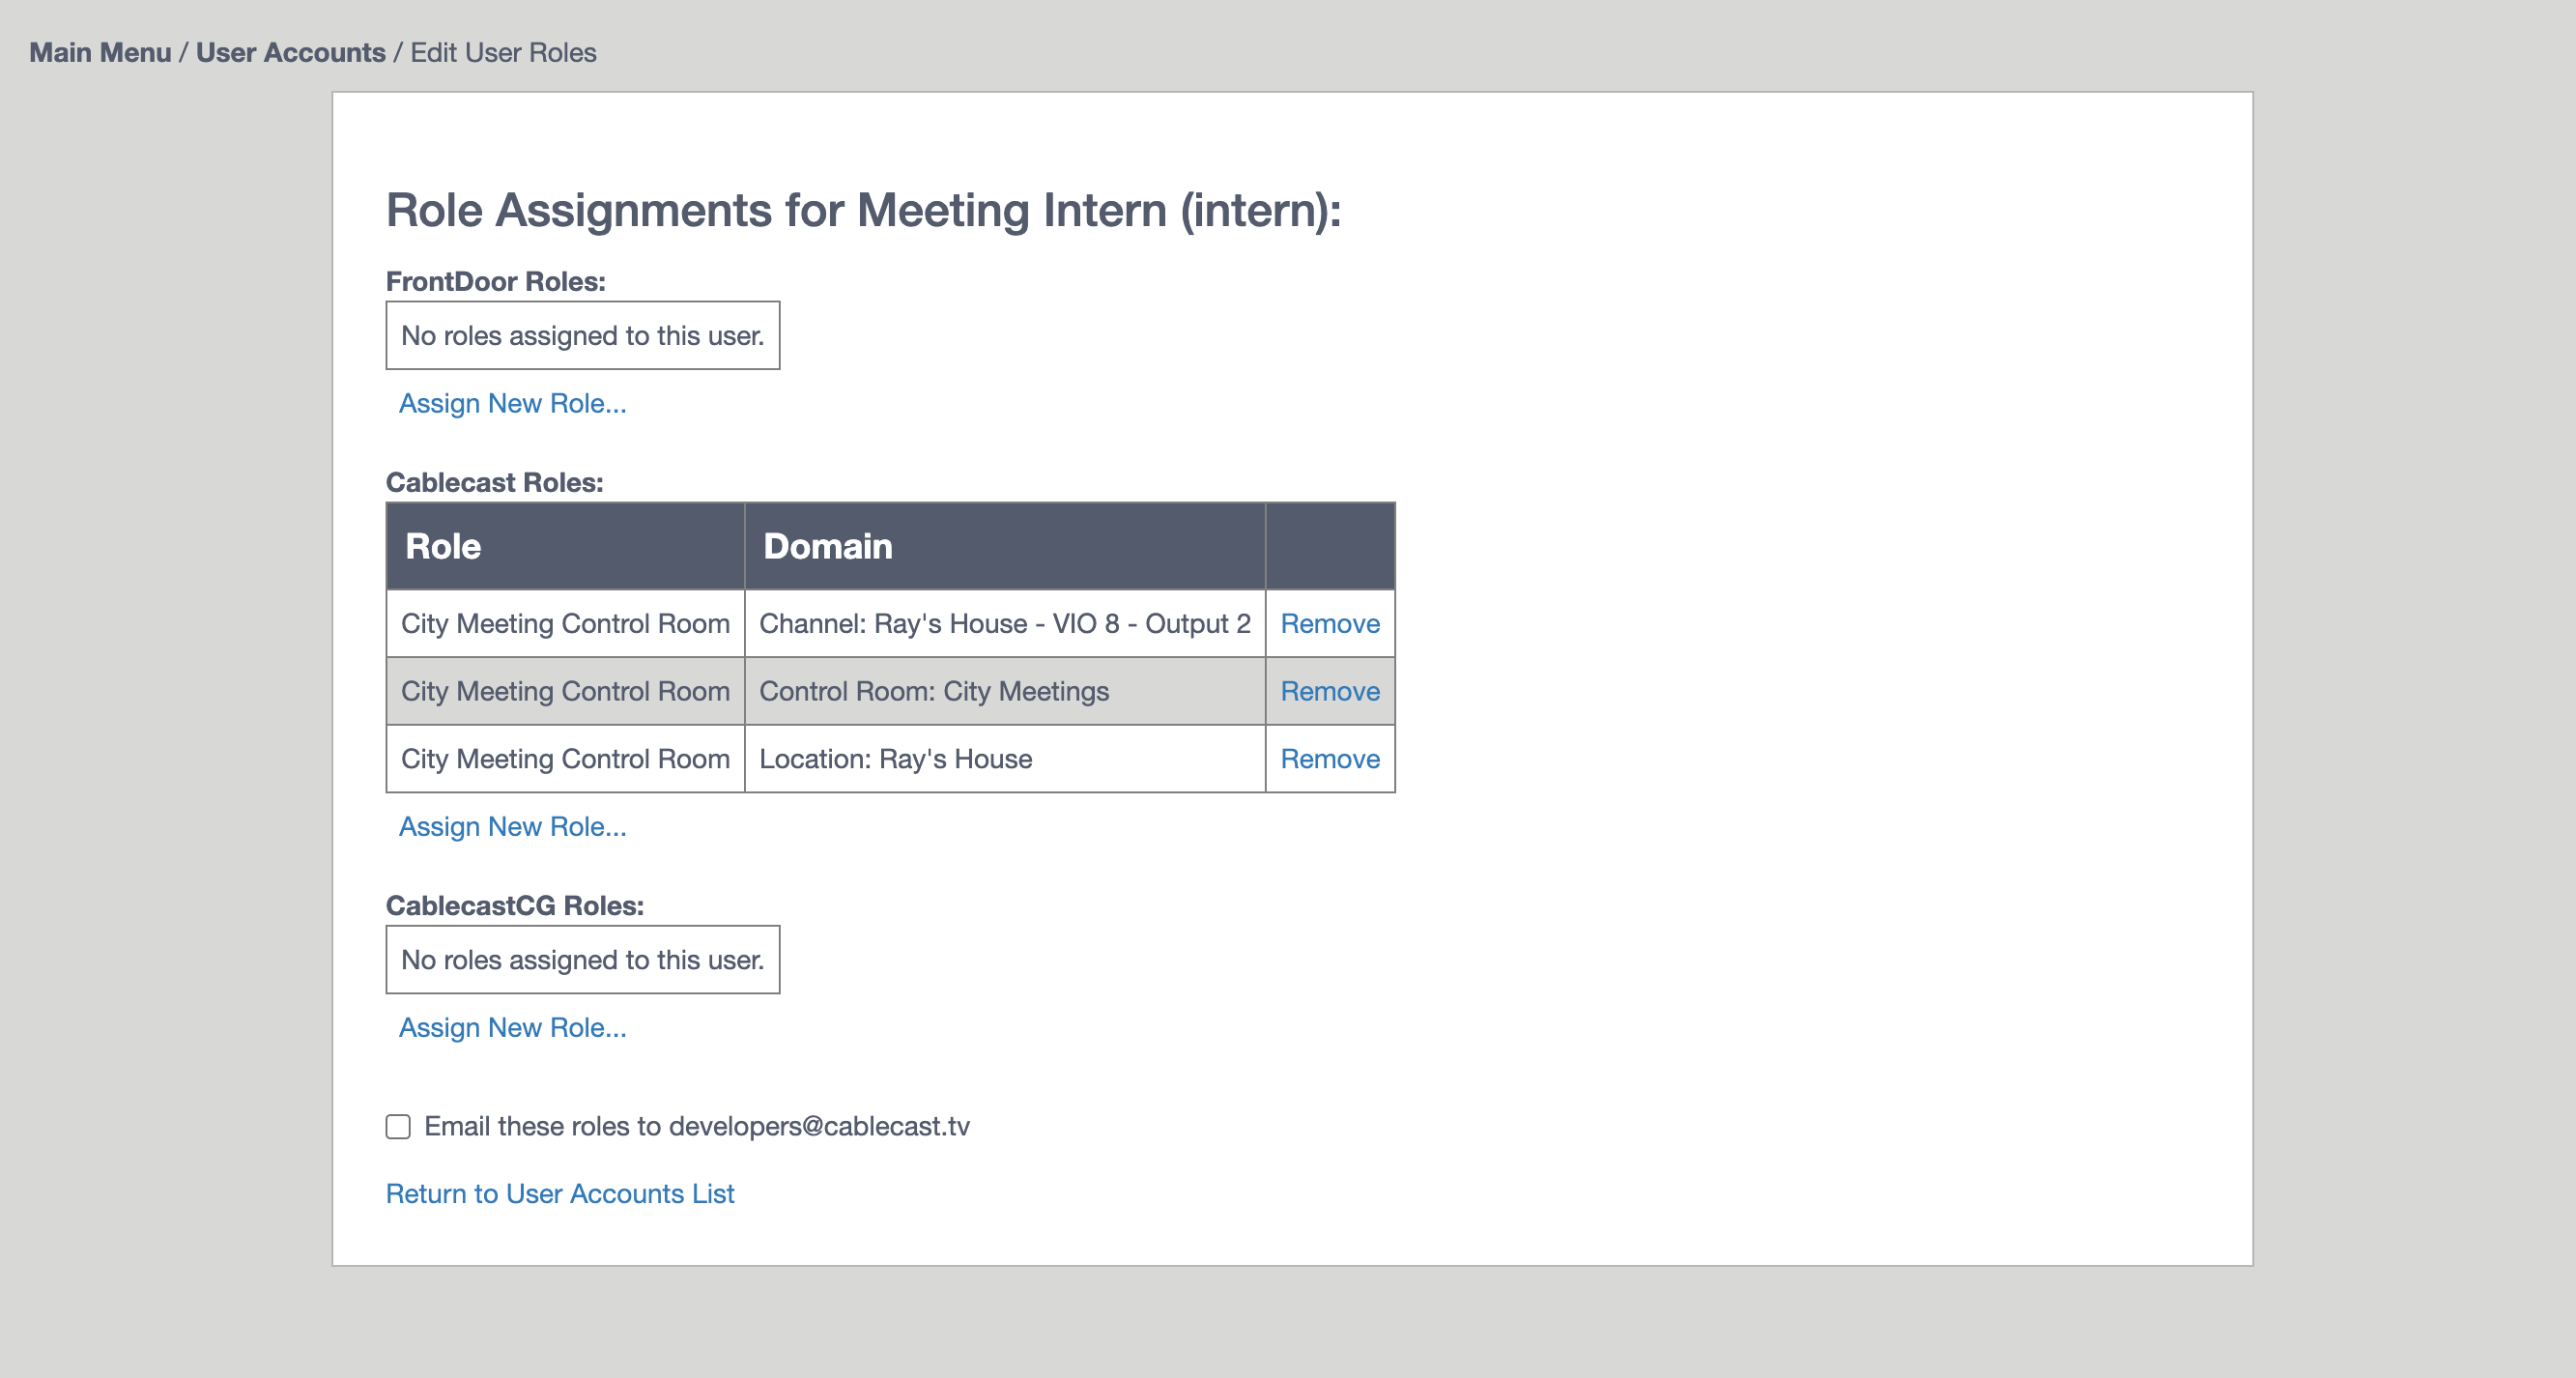
Cablecast applies the least permissive access level possible based on a user's Roles and Access Rights. Users without the Operate Control Rooms Access Right at the Location or Channel level cannot load events in the Event Bar — they can only operate the devices and outputs explicitly defined by the Control Room.
Creating Macros in Control Rooms
You've now covered the full Control Rooms setup — from building Control Rooms and configuring devices to creating Macros and managing access. For a deeper dive into building and fine-tuning Macros, see Creating Macros in Control Rooms.
