Configuring ENCO enCaption Device with Cablecast
Overview
The ENCO enCaption unit is an external, Windows PC-based system that generates closed captions for files or audio streams fed into it. Typically, the unit is controlled independently by the end user. Cablecast allows tighter integration with enCaption for both Offline (file-based) and Online (real-time) captioning modes. Follow this guide to set up that integration.
Configuration
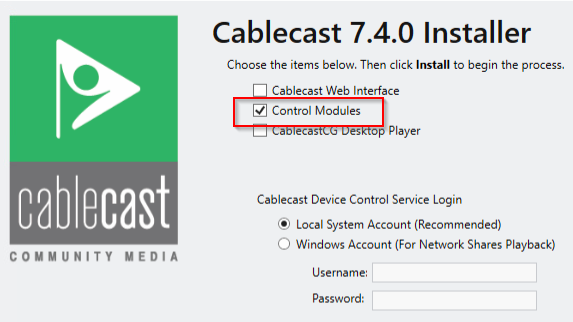
Install Control Modules on the enCaption PC
To integrate the ENCO unit with Cablecast, you'll need to install Control Modules on the ENCO enCaption PC.
You'll need the Cablecast installer to do this. You can find it on any of your Cablecast units at C:\TRMS\CablecastInstallers. Copy the installer to the ENCO enCaption PC, then right-click it and select Run As Administrator. Click Advanced and select Control Modules only.
Add the enCaption PC to Cablecast
After installing Control Modules, add the ENCO enCaption PC to your Servers list in Cablecast. Go to Settings → System Settings → Servers and click Add. Give it a name (for example, Enco) and enter the IP address of the ENCO enCaption PC.
Once Cablecast is configured, ENCO will need to complete the configuration on their end. Contact ENCO support for assistance with that part of the process.
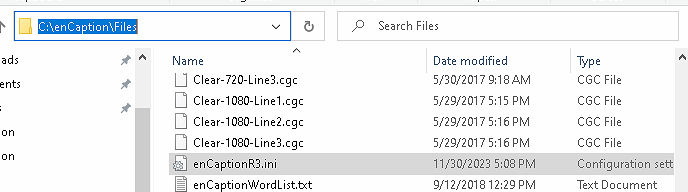
Confirm the INI File Settings
After ENCO has completed their configuration, verify the settings in the INI file on the enCaption PC. The INI file is typically located at C:\enCaption\Files. Depending on your version of the enCaption software, the file will be named either enCaptionR5.ini (Rev5) or enCaptionR3.ini (Rev3).
Confirm that the webencaption settings are present and not commented out. Lines beginning with ; are ignored by the software. The Host value should be set to the bound IP address of the ENCO device.
Note: If you edit any of these settings, restart the ENCO software for the changes to take effect.

For more on binding the IP address, see Configuring ENCO enCaption Device: Bind Address.

Create a Control Module Set
Next, add a Control Module Set for the ENCO device. Go to Settings → Location Settings → I/O → Control Module Sets and click + New. Fill in the following fields:
Name — for example, Enco
Server — select the ENCO enCaption server you added earlier
Control Module — select EncoCCCM
Leave the Port/IP field empty. That field is used for video routers — either an IP address for IP-controlled routers, or a serial port for serial-controlled routers. It doesn't apply to the ENCO enCaption setup.

Add the ENCO Device
Finally, go to Settings → Location Settings → I/O → Devices and click New. Fill in the following fields:
Name — for example, Enco Andov
Device Function — Playback Only
Device Type — Caption Encoder
Device CMS — select the Control Module Set you created in the previous step
Leave all remaining fields — including Router Input, Device Address, Device Formats, Take Delay, Post Roll, and Device End Action — at their defaults. Your configuration is now complete.

Offline Captions
To caption an existing file in Cablecast, open the desired Show Record and select the Text Tracks tab. Enable the Auto Generate Captions toggle, then click Settings to confirm the caption provider. If ENCO enCaption is your only captioning device, it will be selected as the Provider by default. If you're also using Cablecast Cloud Captions, select Enco enCaption from the Provider dropdown and click OK.
Note: enCaption Offline SCC files generate pop-on style captions only.
Cablecast Show Record Text Tracks tab with the Auto Generate Captions toggle enabled and the Settings button highlighted.


Once the Show Record is saved, Cablecast will create and process the captioning job. You can check the status of the job by returning to that page. Here's what happens behind the scenes:
Cablecast copies the digital file to the ENCO PC.
ENCO detects the file and generates caption data, creating an SCC file.
Cablecast detects the SCC file and copies it back to the main Cablecast server.
Cablecast places the SCC file alongside the original digital file and updates the VOD, if one exists, to include the captions.
Online Captions
The ENCO enCaption unit can also generate live, real-time captions. Cablecast doesn't automatically route signals to and from the ENCO system, but you can control the device manually through Control Rooms.
Online captions can't be scheduled. To control the ENCO device, go to Control Rooms in the left-hand menu (the gamepad icon) and click Action next to the Enco device. This opens the Confirm Actions dialog, where you can select one of the following from the Action dropdown:
Start Transcribing — Sets the mode to Real-time, starts the Recognizer, and starts the Encoder.
Stop Transcribing — Sets the mode to Offline, stops the Recognizer, and stops the Encoder.
Change Mode — Switches between Real-time and Offline modes.
Click Take to execute the selected action.


Have questions? Contact Cablecast Support
