Smart Asset Management: File Stores
Overview
Smart Asset Management (SAM) is how Cablecast 7.5 manages your content across your video servers, VOD, NAS/external storage, and Cloud Storage. Any content available to your Cablecast system will be stored on File Stores.
NAS Device Minimum Requirements
The NAS device must have SMB 3 Support, and the ability to have a share or folder setup with username and password that is the same as the Cablecast unit's windows level credentials that will be used in connection with the NAS device
**NOTE**
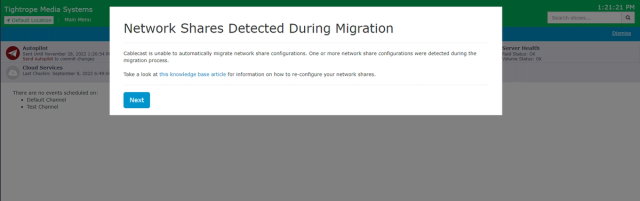
When Cablecast 7.5 migrates Control Module settings to file stores, it can not migrate Network Shares to File Stores. This is because it is impossible to reliably determine how local volumes and network shares relate to remote machines during the migration. Additionally, Cablecast has no knowledge of which PortSettings were NAS not associated with a video server. For these reasons after upgrading to Cablecast 7.5 all Network Shares used for playback will need to be reconfigured as file stores.
- If the network share was sharing a content directory on an existing video server's content drive.
- In situations where a video server was configured to share its content drive so other video servers in the system could play back content from it, then the SMB address should be added as a UNC Mount to the Video server's FileStore. A new file store does not need to be created, as File Store with a Local Mount has already been created for the content drive on the video server.
- If the network share was sharing a folder on a NAS or non-Cablecast server
- In situations where the network share was not sharing a local Cablecast content drive, Cablecast will not have migrated any File Stores over. In these cases create a New File Store with a single UNC mount with the SMB address pointing at the network share.
File Stores
File Stores can be found by going to System Settings > File Stores. File Stores can be thought of as a unique folder of content that lives somewhere, such as the E:\ (Content) drive of your Video Server. File Stores are used to define different areas within your systems to store files. Files can include video files for show records, video-on-demand content, recordings (encodes), agenda PDFs, thumbnails, and more.
NOTE: You should never have a file store that points to the same folder of content as another file store.
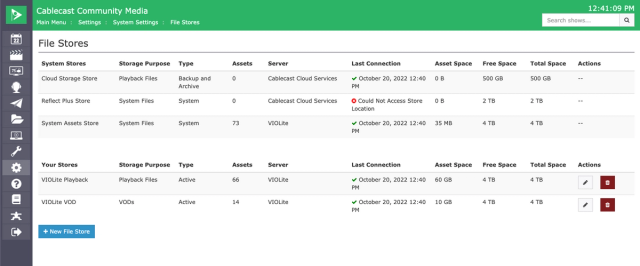
The File Stores page gives you a quick overview of basic statistics for each File Store. Each configured store will show the Storage Purpose (Playback Files, VODs, or System Files), the Type of store (Active, Playback and Archive, or System), how many Assets are in the store, what Server the store is associated with, the last time Cablecast fully scanned the Store, how much space assets are taking up, and how much free space is available on the store.
NOTE: If the File Store is located on a non-Cablecast server, such as a NAS, the Server, Free Space, and Total Space values will not be available in this display.
There are two main types of File Stores - System Stores and Your Stores. System Stores are automatically created by Cablecast and are not configurable by the user. Your Stores is where you can create and configure user stores. Let's take a look at Your Stores first.
Your Stores
When creating a new store, you'll be prompted to fill in the following info:
- Give the File Store a unique name
- Select the appropriate Server
- Select None if the store will be located on a non-Cablecast server.
- Type
- Active - the Store will contain assets that are actively used by the system for playback or VOD streaming.
- Backup and Archive - the Store will only be used for backing up/archiving files.
- Purpose
- Playback Files - the Store will contain video files for playback on video servers.
- VOD - the Store will contain VOD assets
- Add a Mount
File Stores are unique, but they can have multiple mounts. Mounts are the different ways to access the content on the store. The two types of mounts that are currently supported are Local and UNC (a network path). A local mount is a file store that is associated with a Cablecast server. For example, your playback server would have a single mount, which would point to your E:\ (Content) drive on your video server. If you have multiple video servers, you would have a mount for each server. A mount for your playback server might look something like below.

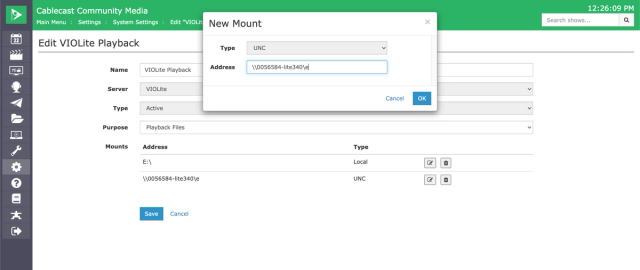
If you wanted to make a File Store accessible to other video servers across the network, you would need to add an additional mount to the File Store. In this case, you would add a UNC mount with the share path for that server in its File Store. Since you can only have one Local Mount per file store, UNC is selected by default when adding another mount to a File Store. Below is an example of what the mount would look like for our Video Server if we wanted to be able to share its content across other Video Servers. We copied the share path for the E:\ (Content) drive on the server by going to the desktop of our VIOLite, opening a new Window, right-clicking on the E drive, and selecting Properties. We then clicked the Share tab and copied the share path and pasted it into our Address for the New Mount.
Be sure to look at the section of this KB on configuring network sharing for Cablecast video servers and NAS storage.
As mentioned above, think of each File Store as a unique folder of content somewhere. If you have additional folders within your server/storage space that you want to make accessible within Cablecast, you would need to create a new File Store for each of those folders. If you want to organize your media in different folders based on the type of programming, File Stores allows you to do that.
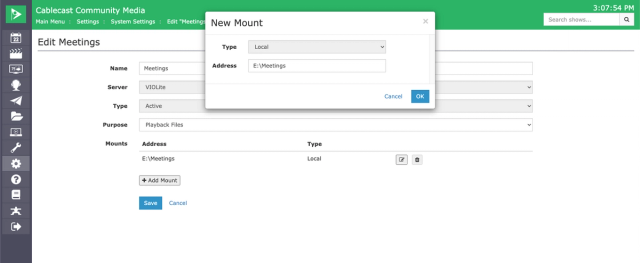
For example, let's say we want to create a File Store on our system called "Meetings." Let's assume our main Cablecast Server is called "VIOLite" and the meetings folder is a sub-folder within the content drive.
- Create a new File Store.
- Name the File Store Meetings.
- Select the server VIOLite.
- Create a Local Mount with Path E:\Meetings
- Click
OKto save.
If you have a NAS or other network storage, a File Store needs to be created for each folder on that storage that you want accessible to Cablecast.
System Stores
System Stores are not editable and are automatically generated and managed by the Cablecast system. All systems will have a System Assets Store.
The System Assets Store is where Cablecast stores thumbnails and uploaded assets, such as custom-uploaded thumbnails, PDFs, etc. Those files are stored on the E (Content) drive of the host server.
If you have purchased Cablecast Cloud Storage or REFLECT+ you will have system stores for those too.
NOTE: The Cablecast Cloud Storage store can only be used for backup and archive purposes. Content on that store cannot be played back directly on a video server. It can, however, be transferred back and forth to Active stores.
For more information on Cablecast Cloud Storage, check out this article.
Setting Up a Cablecast Server and/or NAS for Network Playback
Aside from setting up the File Stores for your network share, there are a few additional steps that need to be taken on the Windows side.
The first step is to make sure you've created an SMB share in your NAS configuration software. When creating a share for a NAS, the share needs to be assigned the same username and password as the Windows account that's running your Cablecast services. The folder you want to open remotely also needs to be shared by turning on sharing on that specific folder, and setting access permissions to everyone, read.
The next step is to enable network video playback in Cablecast. This should be done when you install Cablecast on your video playback server(s). If you have more than one video playback server and want them to be able to play video files off of each other, make sure to follow these steps for each server. If you wish to share VOD content to a NAS, you'll also need to follow these steps on the VOD.
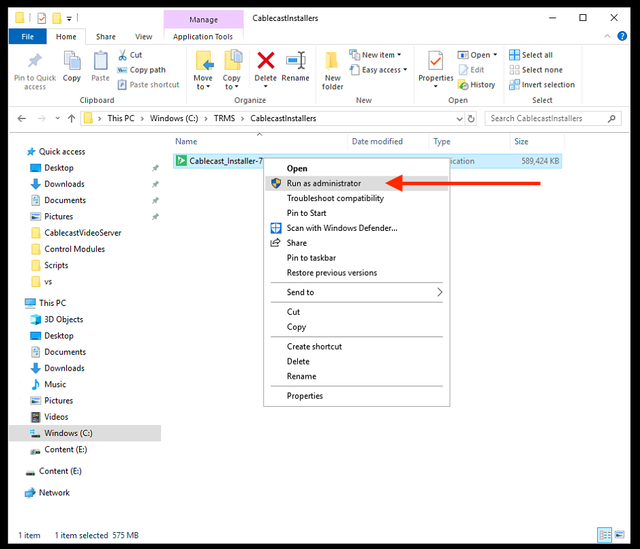
First, right-click the Cablecast installer and select "Run as Administrator."
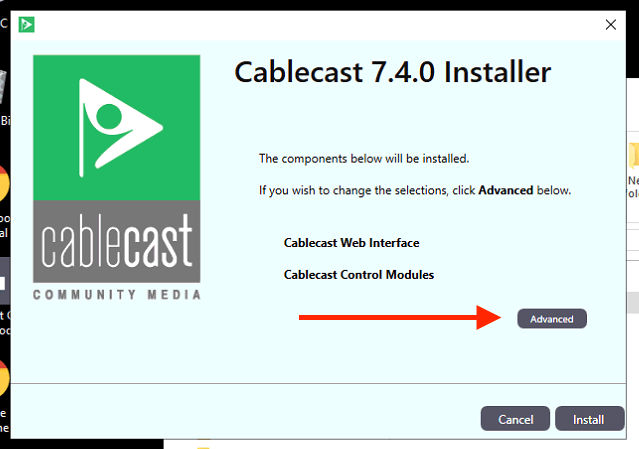
On the first prompt, click "Advanced."
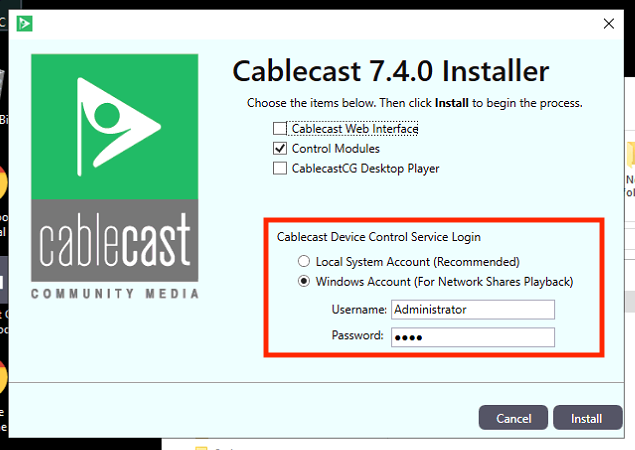
Enter the administrator credentials for the machine. Then click "Install."
Within about 5 minutes the remote files will show up in the Assets pages and you should be ready to create your File Store for your NAS.
Once your File Store shows that it's connecting, you'll need to go select it on your Video Server outputs if you wish to do network playback from that file store. If you have multiple video servers or a NAS, you can select more than one File Store to be able to playback from. To do that go to Settings > Location Settings > I/O > Devices and edit your video server output(s). Scroll to the bottom and select your Playback File Store(s). Be sure to click the blue "Save" button once you've selected your File Store(s).